Serving the worldwide community of radio-electronic homebrewers. Providing blog support to the SolderSmoke podcast: http://soldersmoke.com
Sunday, December 31, 2017
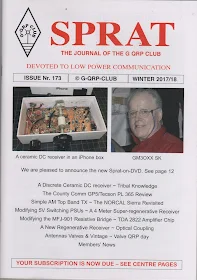
Ceramic DC Receiver on the Cover of SPRAT. Happy New Year to All! Straight Key Night.
G-QRP very kindly put my little DC Receiver on the cover of issue Nr. 173. (Very sorry to see that GM3OXX has become a Silent Key. )
As we often say on the podcast, if you are not subscribing to this wonderful magazine, you are missing out on a lot of great ideas and circuits. Information on how to join the club and start receiving SPRAT can be found here: http://www.gqrp.com/join.htm It is only 22 bucks!
Reminder: Straight Key Night is upon us. It begins at midnight UTC 1 January. It is a great way to begin the new year. My HT-37 and my Drake 2-B are warming up now (and are helping to keep the shack warm on a very frigid day). HNY to all! 73 Bill
Saturday, December 30, 2017
Building the Ceramic Discrete Direct Conversion Receiver - Part 3 -- The Audio Amplifier
Once you have achieved JOVO and have the oscillator covering the frequency range you desire, it will be time to build the audio amplifier stage. Now, I'm sure many of you will be tempted to just throw an LM386 or 741 op amp in there. But don't do that! You want to build the WHOLE receiver. Don't let that IC manufacturer rob you of the FULL HB EXPERIENCE.
The DISCRETE amplifier circuit we will used is based on a design that several of us used to replace the LM386 in the BITX20 receiver.
OM Arv presents one version here: https://sites.google.com/site/arvidevans/discretecomponentafamplifier
And here is a tutorial that does a GREAT job of explaining how this circuit works. I strongly recommend you study the tutorial carefully. This site will allow you to really understand how your amplifier works.
It is not that complicated. But here you have to take care to make sure that your amplifier does not turn into an oscillator. Keep the outputs away from the inputs. Keep the leads short. Some planning is needed here. Click on the picture below for layout ideas. The right 1/3 of the board contains the AF amp circuitry.
After you build the circuit, TEST IT! If you have an AF signal source and a 'scope, great. But if not, just hook some earbuds or headphones to the output, connect a 9 V battery and PLACE YOUR FINGER on the input of the first AF amplifier. If you hear a noticeable increase in hum when your finger makes contact, congratulations, your AF amplifier is amplifying.
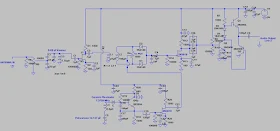
The Complete Schematic
When you get this stage and the oscillator working, you are 3/4 of the way to completion. Next we will built the mixer, and then the front end filter and amplifier.
Thursday, December 28, 2017
Caribbean Beach Listening Post
Oh man, I wish I was still there. It was 85F and very nice on Christmas Eve on the Eastern tip of the Island of Hispaniola in the Dominican Republic. I wasn't transmitting -- this time I was just doing some listening with my trusty Sony SW receiver. But it did occur to me that the palm trees would have been EXCELLENT antenna supports.
On December 24, 2017 around midday on 17 meter SSB I heard:
NE2Q, NO4FR, IZ2LSR, N4DIR, PA1CC, N4LO, EA7JR, MI0TLG, VE1IOU, PA3WB, IU5FFM, KD4POK, HK2RMR, KB5VUM AND KG9DW I was just using the little telescoping antenna that comes with the Sony.
On December 26, 2017 also around midday I heard on 20 meter CW K8GL AND ZS1C. They were in contact -- I was located between them.
I am now back in Virginia where it is 15F, dark and windy.
Friday, December 22, 2017
The Three Body Problem by Cixin Liu
Strongly recommend this sci fi book. Lots of physics
Some e!ectronics. And even a bit of Morse. Ask Santa.
Some e!ectronics. And even a bit of Morse. Ask Santa.
Sunday, December 17, 2017
Building the Ceramic Direct Conversion Receiver Part 2 -- Building the VFO -- Our Goal is JOVO!
 |
| DC RX VFO and Buffer |
I'll put the full schematic at the bottom of each of the posts so that you can easily refer to the big picture. Above you see the schematic of the VFO circuit.
OK, here we go. Let's build the oscillator. Our goal is JOVO -- the Joy Of Variable Oscillations.
At this point you should have a big-enough copper clad board, and you should have given at least some thought to what kind of enclosure you are going to put the board in when you are done. It pays to think ahead at least a bit, but don't get so carried away with planning that you never get around to building.
You should plan the allocation of the space on the board. Think about where you are going to place each stage. You can mark out the spaces with a pencil or a Sharpie marker. You might want to look at my board for ideas:
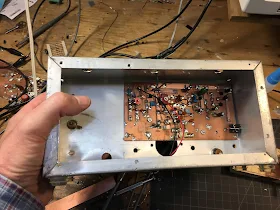
In the picture above you can see the four stages. On the left side of the copper-clad board you can see the Front end: the input filter and the RF amplifier (transistor near the top). Moving toward the center you can see the mixer stage (around the circular 1k trimmer potentiometer). Below the mixer (near the big round hole in the Bud Chassis) is the Variable Ceramic Oscillator stage and its buffer amplifier. The right 1/3 of the board is taken up by the audio amplifiers. Note the use of Manhattan pads throughout. Click on the picture for a closer look.
Once you know where you will put the VFO, eyeball the schematic and think about where you will need Manhattan pads. I often start by thinking of three rectangular pads for each transistor, one for each lead. You can see that there are a lot of parts hanging off each of the terminals. I sometimes put a long strip across the top or the middle of the board to carry the DC voltage.
Since this is an oscillator, you don't have to worry too much about keeping the outputs away from the inputs. You want this one to take of on you.
For the feedback capacitors (C16 and C17) and the output capacitor (C19) , get some ceramic disc NPO caps. I put a 180 pf cap at C17 only becasue I didn't have a second 150 pf cap in the junkbox. Either value will probably work.
You will need a ceramic resonator. I recommend this one from Mouser. Again, buy a bunch. They are cheap: https://www.mouser.com/productdetail/520-zta7.3728mt
You can, to start, build this circuit WITHOUT the two components that allow you to vary the frequency: without L4 and C5. Just run the left end of the ceramic resonator to ground. See below.
Connect a 9V battery to the top of C24. Without L4 and C5 (with one end of the resonator to ground) you should be oscillating at around 7.168 MHz (the capacitors in the oscillator circuit are pulling the frequency down from 7.37 MHz).
You need some way to find out if it is oscillating. If you have an oscilloscope, great. Put the probe at the output and take a look. But perhaps a simpler and more satisfying way to do this test is with a radio receiver. Tune the receiver around 7.168 MHz. You do not need to connect your receiver to the oscillator. You should be able to hear it. If you do, congratulations. If not, check your work. Be patient. This is not plug and play radio!
Once you get the thing oscillating, it is time to make it variable. Here is an opportunity for variety and experimentation. Here are some of the options you have:
Here is what I found. The frequency stability of these circuits vary. But all of them are stable enough. They might drift a bit so that you have to retune the dial every few minutes. If that realy bothers you you can upgrade to the air core coil with air variable cap arrangement.
When I put just a variable capacitor that goes from 17 pf to 159 pf between the ceraamic resonator and ground, I was able to tune the oscillator from 7.220 MHz to 7.420 MHz.
If I put a fixed 8.18 uH coil between the ceramic resonator to ground that moved the frequency to 7.010 MHz. You could use a toridal core coil for this, but I had best results with an air core coil. By putting the 17-159 pf variable cap between the coil and ground (similar to the arrangement shown above) I could tune from 7.010 MHz up to 7.367 MHz.
You could also replace the variable capacitor with a voltage variable capacitnce diode (aka a varactor or a varicap diode). I had good results with an MV2301.
You could try using a cheap little polyvaricon capacitor for C5, but my best results came with an air variable. Walter KA4KXX points out that nice variable capacitors are available here:
https://www.amplifiedparts.com/products/capacitor-365pf-variable If you can, get one with a reduction drive to slow the rate of tuning as you turn the shaft. If you can't get one of these, try to get find a reduction drive to slow down the tuning.
I ended up using a 3 uH air core coil with a variable cap of around 365 pf this allows me to tune from 7.115 MHz to 7.300 MHz (all of the phone portion of the band) with very good stability -- Juliano Criteria levels of Stability.
One more idea: As you build this stage, or right after you finish it, go ahead and build a dulicate circuit, perhaps without the variation components. Why? Well that second oscillator might be useful when it comes time to peak and tweak the front end input filter of your receiver. And that second oscillator can become the start of a second version of this project.
We talked about this project in SolderSmoke Podcasts #199 #200 and #201
Now I'm going to the beach. I hope the holiday season bring you all joy -- especially the Joy of Variable Oscillations. Send us reports on your progress, your joy, or your tales of woe.
 |
| The Big Picture |
Saturday, December 16, 2017
Building the Ceramic Direct Conversion Receiver -- Part 1 Introduction, Stages, Parts.
I hope many of you decide to build this little receiver. With it, you can break into the ranks of those intrepid ham homebrewers who have actually built a receiver. Today I'll begin a series of blog posts on how you might do this. Of course, there are many ways of proceeding. I will describe my method.
FIRST: ALWAYS look at this receiver as a collection of stages. Understand what each stage does and how they all work together. Build it stage-by-stage. Proceed to the next stage only after you confirm that the stage you just built actually works.
I see this receiver as having four stages:
1. Front end (RF gain control, input filter, first RF amplifier).
2. Mixer
3. Ceramic resonator variable frequency oscillator (and buffer)
4. Audio amplifier (consisting of four transistors and associated parts).
In the picture above you can see the four stages. On the left side of the copper-clad board you can see the Front end: the input filter and the RF amplifier (transistor near the top). Moving toward the center you can see the mixer stage (around the circular 1k trimmer potentiometer). Below the mixer (near the big round hole in the Bud Chassis) is the Variable Ceramic Oscillator stage and its buffer amplifier. The right 1/3 of the board is taken up by the audio amplifiers. Note the use of Manhattan pads throughout. Click on the picture for a closer look.
What you will need: In most cases, you shouldn't buy individual parts for this receiver. I won't be providing a BOM. Here is what I think you should do. If you do not already have a good stock of electronic parts, start developing one. Buy assortments of parts, or at least several of each part that you will need. I use e-bay, amazon, mouser, digikey. The parts are out there.
-- Get an assortment of resistors. 1/4 watt resistors will do.
-- Get a bunch of .1uF capacitors. You will use a lot of these as bypass caps.
-- Get a bunch of 2N3904 and 2N3906 transistors.
-- Get a bunch of 2N2222 transistors
-- Get a bunch of MPF102 and/or 2n2819 FET transistors.
-- Get an assortment of small electrolytic capacitors.
-- Get some Zener diodes in the 6-8 volt range.
You will need some trimmer caps (8-80pf work fine). Some 1K trimmer pots. and some other stuff.
Get some copper clad board. Pete suggest this, or something like it.
https://www.ebay.com/itm/18-pcs-4-x-6-CEM-1-060-2-oz-Single-Sided-Copper-Clad-Laminate-Board-PCB/311756276147?ssPageName=STRK%3AMEBIDX%3AIT&_trksid=p2057872.m2749.l2649
Try to avoid the cheap fiber glass boards. I prefer single-sided, but double sided is OK too.
You will need to cut the board. Get some tin shears. Mine look like big strong scissors. Use them to cut your boards to size AND to cut the little isolation pads for Manhattan construction.
Crazy glue. I kind of like Gorilla Glue liquid (not gel).
Small wattage soldering iron. 35 W or so. Get a small fan to keep the smoke and glue fumes out of your respiratory system.
I used a piece of scrap wood to get the variable cap into position.
Here it is with my fancy Archer Dial. I used a bit of copper clad board to finish the front panel
and to support the audio gain control.
Next time I'll write about how you might build the Variable Ceramic Oscillator stage.
Saturday, December 9, 2017
SolderSmoke Podcast #201 Santa, Storms, BUILDING A DC RX, SDR, uBITX
SolderSmoke Podcast #201 is available: http://soldersmoke.com/soldersmoke201.mp3
9 December 2017
Santa Juliano
Forest fires, snow storms, and an earthquake.
Santa arrives from Hyderabad -- uBITX in the house.
Radio history. First transtalantic amateur contacts.
Bill's International Brotherhood Ceramic Discrete Direct Conversion Receiver Project.
-- Goals -- Build your own receiver. Really. From scratch. No cheating.
-- How to get started. Get parts and tools.
-- Stage by stage.
-- VFO first -- maybe build two.
Bill built two already
-- Nephew is testing the first one.
-- Polyvaricon limitations.
-- Varactor limitations
-- Variable cap limitation.
MEETING THE JULIANO STABILITY CRITERIA
Understanding the F5LVG mixer
Pete goes to the dark side with an SDR receiver.
Pete's 800 Watt Amplifier gives him trouble. TRGHS.
People in the News
Cliff Stoll -- Still Passionate about Electronics
Peter Parker -- VHF/UHF By the Bay
Yardley Beers -- Early SSB with "The Black Rose"
John Kraus -- Moonbounce without the Moon.
MAILBAG
Sunday, December 3, 2017
Discrete Ceramic 40 Meter Direct Conversion Receiver in Action (Video) -- BUILD THIS THING!
I've been holding off on making this video until I improved the stability. N6QW is vigilent! I only did this video after certifying that it meets the Juliano Stability Criteria. I had to dispense with the polyvaricon and go with an air variable.
We will be talking about this on the SolderSmoke podcast next weekend. I hope to put on the blog a stage-by-stage discussion of how to build this receiver.
The dial from HI8P and the knob from a SW receiver that Elisa gave me definitely add soul to this new machine.
JOIN THE RANKS OF THE TRUE HOMEBREW RADO MAKERS! BUILD A RECEIVER! BUILD ONE OF THESE!
Saturday, December 2, 2017
Cliff Stoll -- Still Passionate About Electronics (Video)
I open Chapter 3 of my book "SolderSmoke -- Global Adventures in Wireless Electronics" with some quotes from Cliff Stoll: "Where's the joy of mechanics and electricity, the creation of real things? Who are the tinkerers with a lust for electronics?" Well Cliff, that would be us!
I'm glad to see in the (obviously) recent video that OM Still has not lost his passion for electronics. You guys will like this one. Keep 'em comin' Cliff!
Friday, December 1, 2017
"The Black Rose" -- Yardley Beers' 1955 HB SSB Transceiver
I've been a fan of Homebrew Hero Yardley Beers W0JF for a long time. Here is a link to previous posts on him: http://soldersmoke.blogspot.com/search?q=Yardley
Yesterday I got a nice e-mail from Boulder Colorado about Yardley's very early SSB rig. I'm guessing that the 4.7 MHz is a typo -- it might have been 3.7 and 14 MHz. FB. Thanks Mike
Bill,
Yardley Beers W0JF moved to Boulder in the early 1950's to work at the National Bureau of Standards (now NIST) laboratory. There he headed the Time and Frequency Division, which maintains the atomic clock. He later taught at the University of Colorado and Denver University.
About 1955 he homebrewed what, at the time, may have been the only SSB transceiver in the world. It was built with individual transistors (no IC's in those days) and Yardley had to grind the crystals himself for the filter. He enjoyed naming his radios and this one was "The Black Rose."
The transceiver ran at 4.7 and 14 MHz. Its 1/2 watt output was fed to a home built amplifier. The transceiver demonstrated the practicality and benefits of SSB in a world where AM was the voice mode.
In the year 2000 Yardley demonstrated this original, old SSB transceiver to the Boulder Amateur Radio Club by using it to make contacts with two club members. Attached to this e-mail are a couple of photos.
73,
Mike W3DIF
Treasurer, Boulder Amateur Radio Club (BARC)
Thursday, November 30, 2017
VK3YE QRP by the Bay Goes VHF/UHF
Peter Parker again hosted the VK3 radio amateurs. This time the event fell on VHF/UHF Field Day weekend. So Peter and his friends went up in frequency and up into SPACE!
VK3HN has a nice blog post here:
https://vk3hn.wordpress.com/2017/11/25/qrp-by-the-bay-chelsea-beach-melbourne-25-11-2017/
Be sure to read about Peter's ankle manacles -- he apparently uses them to get a good ground (sea) plane while running pedestrian mobile on the sea shore. Peter is DEDICATED!
Wednesday, November 29, 2017
Listening for Your Own Signals on the Long Long Long Path
From: http://qrznow.com/the-w8jk-is-a-famous-and-effective-dx-antenna/
Round-the-world paths The bi-directional nature of this antenna makes it possible to discover open round-the-world paths, something not possible with a normal beam antenna. The technique used by Kraus is to rotate the beam slowly, sending short Morse code dots, with a full-break-in or QSK transceiver
Tuesday, November 28, 2017
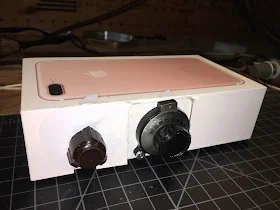
Videos of iPhone Box DC Receiver
These are just a couple of short videos that I made for my nephew before sending him this receiver.
As you can hear, deafness is not a problem with this design! I did make some frequency stability improvements after this video was made -- I think you can hear a bit of drift. Still, not bad for a very simple circuit using a polyvaricon superglued to the back of a cardboard box.
I'll post more videos of the second version of this receiver. There are further improvements in frequency stability. My goal: "Juliano Si5351" levels of stable-ness.
Saturday, November 25, 2017
Polyvaricon Variations -- Polyvaricons Are Not all The Same
When I built the first prototype of the iPhone DC receiver, I just reached into my junk box and used a polyvaricon capacitor for the main tuning control. It was marked PL 051. I was really pleasantly suprised at the stability of the Variable Ceramic Oscillator circuit. I could tune the entire 40 meter band with complete stability -- Juliano levels of stability.
Has anyone else noticed variations like this in the stabilty of polyvaricons?
The dial in this version is an Archer device that has been kicking around in my junkbox for more than 20 years. I think it was given to me by my old friend Pericles HI8P -- this adds a tremendous amount of soul to this new machine). The box is an old Bud aluminum chassis. Man, this thing sounds great. I will try to post a video soon.
Wednesday, November 22, 2017
iPhone Direct Conversion Receiver with Variable Ceramic Oscillator
A while back Bob N7SUR got us talking about winter projects. Receivers. Of course, Pete and I quickly went down different paths. Pete is making great progress with lots of interesting digital circuitry. He is going over to the dark side. Check it out here:
I went with simplicity. Extreme simplicity. Direct Conversion (thanks Wes!). Discrete components. No chips. Analog Oscillator. 40 meters -- monoband.
 |
| Schematic updated 29 November 2017 |
There it is. You can click on the picture to make it larger. Here is an outline of the circuitry:
-- Single tuned circuit bandpass filter preceded by a simple pot that serves as a gain control.
-- JFET RF amp
-- Singly balanced passive mixer inspired by F5LVG's RX-20 in SPRAT 100. For the coil I used one of the many trifilar toroids that Farhan gave me.
-- The local oscillator is the coolest stage. I used a 7.37 MHz ceramic resonator and a circuit inspired by Miguel PY2OHH. With a polivaricon I can tune the entire 40 meter band. I put a reduction drive int here to make tuning easier.
-- The AF amp is an op-amp free design. It works well into ear buds or into a computer speaker.
-- Perhaps in an effort to catch the attention of the younger generation, I built it into an iPhone box.
Please let me know if you spot any flaws in the circuit, or see any places where it might be improved.
More to follow. This prototype is now in the mail, en route to my nephew John Henry who will be testing it for me.
Saturday, November 18, 2017
China and SETI: What Happens if China Makes First Contact?
Here is a really amazing article from The Atlantic. It is very thought provoking. Mind blowing. Strongly recommended.
You can read it here:
https://www.theatlantic.com/magazine/archive/2017/12/what-happens-if-china-makes-first-contact/544131/
Or you can listen to a reading of it (like a podcast) here:
https://soundcloud.com/user-154380542/what-happens-if-china-makes-first-contact-the-atlantic-ross-andersen
Thanks to Mike Rainey AA1TJ for alerting us to this.
Friday, November 17, 2017
Jeff Murray's Grumpy Audio Guy from 40 meters
I've talked to this guy several times. He usually waits until I'm testing a new rig.
https://www.facebook.com/6sj7jeff/videos/10208309648978285/
I'm sure Pete has worked him too.
https://www.facebook.com/6sj7jeff/videos/10208309648978285/
I'm sure Pete has worked him too.
Saturday, November 11, 2017
Amazing Homebrew/Boatanchors QSOs on 40 --Six solder melters in a row!
 |
| Al W8VR |
After a day of happy tinkering with the Direct Conversion receiver I've been working on, I turned off the soldering iron and got on 40 meter SSB with my BITX Digi-Tia.
First -- Steve W4IJ came back to my CQ. Steve is a boatanchor enthusiast and has written for Electric Radio magazine. FB.
 |
| W4IJ Boatanchors |
When Steve signed off, I got into a contact with Pete W8NBO. We had spoken before and he had told me of a homebrew transmitter he'd built as a kid. This time I asked for details: It was a 6AG7 oscillator to a 6L6 amplifier. He ran it with an S38 (brave man!). He described what must have been a very painful effort to hack (literally) the needed holes in the transmitter chassis using just a spike, a hammer and a file. I told him this brought back my memories of similarly painful chassis work (mine was for a power supply for a Heath HW-32A).
At this point we were joined by Arnie, W2HDI. Arnie's rig is in Stowe Vermont, but he was running it remote from the South of France where he and his wife were celebrating their 50th wedding anniversary. Arnie shared with us memories of similar chassis pain -- his were related to an external modulator that he built for a DX-40. I think he said that all he had was a hole punch and a file. Oh, the humanity!
Then Al W8VR joined the conversation. Al said that he's been in the game so long that his early rigs were built using cigar boxes as chassis. I pointed to a connection: I noted that my BITX rigs are enclosed in what could be considered cigar boxes. Al's QRZ page picture has a magnificent AM rack rig that he said was actually built twice. There is also an HRO-60 in the picture. FB. Check it all out at Al's web site. Click on the mic for the write ups, the key for the pictures. http://www.w8vr.org/
Then Dennis K0EOO called in. Holy Cow! Dennis and I spoke not long ago. You may recall my enthusiastic write up of his beautiful 1974 SSB rig:
and
This was almost too much. Rarely will you spontaneously come across so many hams who have melted so much solder. FB.
Icing on the cake: When I returned to the bench, I fired up the DC receiver and heard Mike KN4EAR talking about his BITX40. I switched to the Digi-Tia and gave Mike a call. He reports making many contacts with his rig. FB.
TRGHS.
Wednesday, November 8, 2017
Beautiful QSL by Jeff Murray K1NSS
Here's a reminder of the amazing art work of Jeff Murray K1NSS.
You can have him draw a QSL for you: Go here:
https://www.jeffk1nss.com/
Well, I got as far as high school intermediate algebra and then I saw a squirrel.
Thank goodness others like Ken N2WWD were paying attention and went on to surf gravity's rainbow of flight dynamics, all in a day's work and play for rocket scientists. Tandem surfing and professional activities somewhat aside, Ken is also actively involved with ARISS, i.e. Amateur Radio on the International Space Station, the group guiding ham radio operations aboard ISS. So Kelvin cool to work with Ken on this New One, with Ken cooking up a special Easter Egg for all you galactic hitchhikers!
What might I draw with you?https://www.jeffk1nss.com/
What might I draw with you?https://www.jeffk1nss.com/
Monday, November 6, 2017
Jan's FB Slovakian SMD TIA Boards
Hello,
I have put up my SMD version of the TIA amplifier boards online, in case
someone wants it. The files are here:
and direct OSHPark order link:
73!, Jan
Sunday, November 5, 2017
Saturday, November 4, 2017
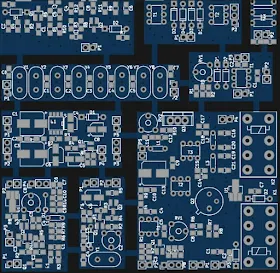
Termination Insensitive Amp Boards from VU3ZMV -- Eagle Files

Here are the eagle file data for the TIA, that I love to use as incorporated in Farhan's ubitx.
The TIA , I tried to realise two such on a double sided pcb measuring less than an inch.
The Ham-Radio Thermatron Roots of Silicon Valley
Hack-A-Day had an excellent piece on tubes and Silicon Valley this week. Makes me want to get the book "Secret History of Silicon Valley."
https://hackaday.com/2017/11/02/silicon-valley-was-built-on-tubes-of-glass/
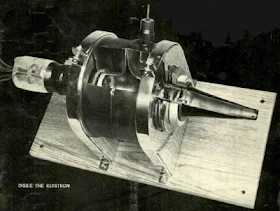
Note above the Klystron prototype mounted on a wooden board. These guys clearly had THE KNACK.
Friday, November 3, 2017
Another Source for BITX Amp Boards - AG4ZP
Thanks for sharing (the infor on the modular BITX boards). I actually had a similar idea a number of years ago and designed a small PCB for the ubiquitous BITX amplifier design. I have the project shared on OSH Park and you can get three of them shipped for $5.
The project is shared here.
73,
Ryan AG4ZP
https://oshpark.com/shared_projects/6mnfQQ6e
Tuesday, October 31, 2017
Cliff Stoll on Software, Snake Oil, and the Creation of Real Things
"I guess today's experimenters build things in software, without ever touching a soldering iron. The hocus pocus is inside the program. It's cleaner this way -- nothing to burn or zap, and you don't need a voltmeter... What happened to home-brewed and breadboarded circuitry? Where's the joy of mechanics and electricity, the creation of real things? Who are the tinkerers with a lust for electronics?"
From "Silicon Snake Oil" 1995 by Cliff Stoll
Monday, October 30, 2017
Modular BITX Boards
From Mike W0MNE to the BITX20 group:
Good afternoon,
I've had a few emails regarding the modular BiTX build and I probably should clarify a few things. First, ON6RF has posted his gerber files on the link at Hackaday.com that I originally posted - just scroll down to around the middle of page to the 'Files' section. Since he has placed these in the public domain they are available to anyone that cares to download them. But, because it is HIS work, I'm not comfortable forwarding the files myself. I don't know if he follows it but I'm sure that he can keep track of how many downloads have occurred and I'm certain he would be gratified to know that his work is appreciated. What I have offered is to make my gerber file for the motherboard available and, if I can manage it, I will post it here in the files section in the Modular BiTX folder. I will also include the pdf files that I created for each of the module showing component placement and values.
As for acquiring the circuit boards, as I stated earlier, I use PCBWAY.com for production. Their prices are excellent and the turn-around time is hard to beat. The cost of the panelized pc board for me was $5.00 for 10 boards with DHL shipping costs of $22.00 for a total of $27.00. I ordered the boards late on a Monday and DHL delivered the finished boards the following Monday morning. Their website says boards that measure 100X100 mm or smaller cost $5.00 for 10 boards so whether you order 1 or 10, the cost is the same. To complete the build you will need 3 boards to have enough bi-directional amp modules so, if you're interested in following thru with building a modular version, you could perhaps join with two other interested parties and split the cost between you. With 3 boards you will be able to build a complete transceiver and have 2 extra modules for experimentation for every section except the bi-directional amps. As an example, on my first prototype I built the double balanced mixer as designed and a second one using an ADE-1 to compare the results. For the record, there was absolutely no noticeable difference between the two. I also built a 4-crystal filter as designed and an 8-crystal QER filter on a second board for comparison. There was a definite difference between these two modules.
I hope this clears up some of the questions and I'm still available via direct email to answer questions specific to my build or class presentation. I'm currently working on the assembly manual for my class and when finished I will post it also in the files section.
--73-- Mike -- W0MNE
Sunday, October 29, 2017
Ron Gang, 4X1MK on "QSO Today" Podcast: Knack Story, Satellites, Quads, Philosophy
Wow, Eric Guth's interview with Ron Gang 4X1MK really resonated with me:
-- Asked about how he got is start in radio, Ron went back further than many of us do in response to this question. He cited his early experiments with "two tin cans and a string." Yes, of course! I'd forgotten all about it, but in retrospect this might have been a very early indication of THE KNACK. (I'll bet many of our readers were also active on the String and Can band.)
-- Ron used a DX-100. FB.
-- Ron was active on the satellites. In his voice you can hear the joy and the burst of enthusiasm that resulted from those early satellite contacts. He also mentions the untimely demise of Oscar 13. Bummer.
-- Ron was the Israel correspondent for 73 Magazine. I held a similar position in Dominican Republic. My friend David Cowhig was at the same time correspondent from Okinawa, Japan. We should have a reunion of "73 Magazine Hambassadors."
-- Ron mentions John Tait EI7BA. John was a regular contact of mine when I was in the Azores. He appears in the SolderSmoke book. He was the one who introduced me to an important Irish accolade: John told me that WD-40 is "the Pope's pee."
-- Toward the end, Ron discusses the wonder of ham radio conversations, and provides a good suggestion on how to get beyond the all-to-common "hello-59-goodbye" contacts.
Ron's comments on the spiritual or philosophical aspects of the hobby were just the thing for a quiet Sunday morning.
Thanks to Eric and to Ron for a great interview.
Listen here:
http://www.qsotoday.com/podcasts/4X1MK
Saturday, October 28, 2017
BITX40 Featured in "Nuts and Volts"
I know many of you will wince when you see Steve's unshielded mic cord lying right next to the front panel antenna connector, but please don't freak out about this -- in the article you will see that Steve acknowledges that the antenna connector would have been better placed on the back of the box. That's an example of the educational value of the BITX40 -- live and learn. Even with the connector like this, Steve was making many contacts.
The "Nuts and Volts" website very kindly let me read the entire article without a subscription.
Try here and click on the blue "digital edition" box:
http://www.nutsvolts.com/magazine/article/meet-the-bitx40-a-single-sideband-transceiver
Or try going directly here:
http://nutsvolts.texterity.com/nutsvolts/201711/?folio=36&pg=36#pg36
Thursday, October 26, 2017
Pete's Simple-ceiver -- Al Fresco Success
N6QW's Simple-ceiver design is being replicated far and wide. Above you can see PA3GUP's beautiful rig in its "Al Fresco" stage of development. For much more of this -- including a cool video of Pete's rig in action -- go to Pete's blog: http://n6qw.blogspot.com/
