Podcasting since 2005! Listen to Latest SolderSmoke

Showing posts sorted by relevance for query jbot. Sort by date Show all posts

Tuesday, January 8, 2013

But Why Did Swamping Resistors Cure JBOT Oscillations?

OK,  so as I mentioned in SolderSmoke 148 (apprently with screeching in the background -- sorry) I managed to tame a bad JBOT oscillation problem by placing 680 ohm resistors across the primaries of the broadband transfomers in the JBOT.  Now I'm wondering how/why this worked, and what we could do to make this kludge unnecessary.  

Am I correct in suspecting that at the problematic frequency of 250 kHz, the one or more of the tranformers are self resonant, and that the resistors just bring down the Q of the -- in effect -- tuned circuit?  This lowering of Q makes feedback and oscillation more difficult, right?  

Here is the background.   Read from the bottom up.   


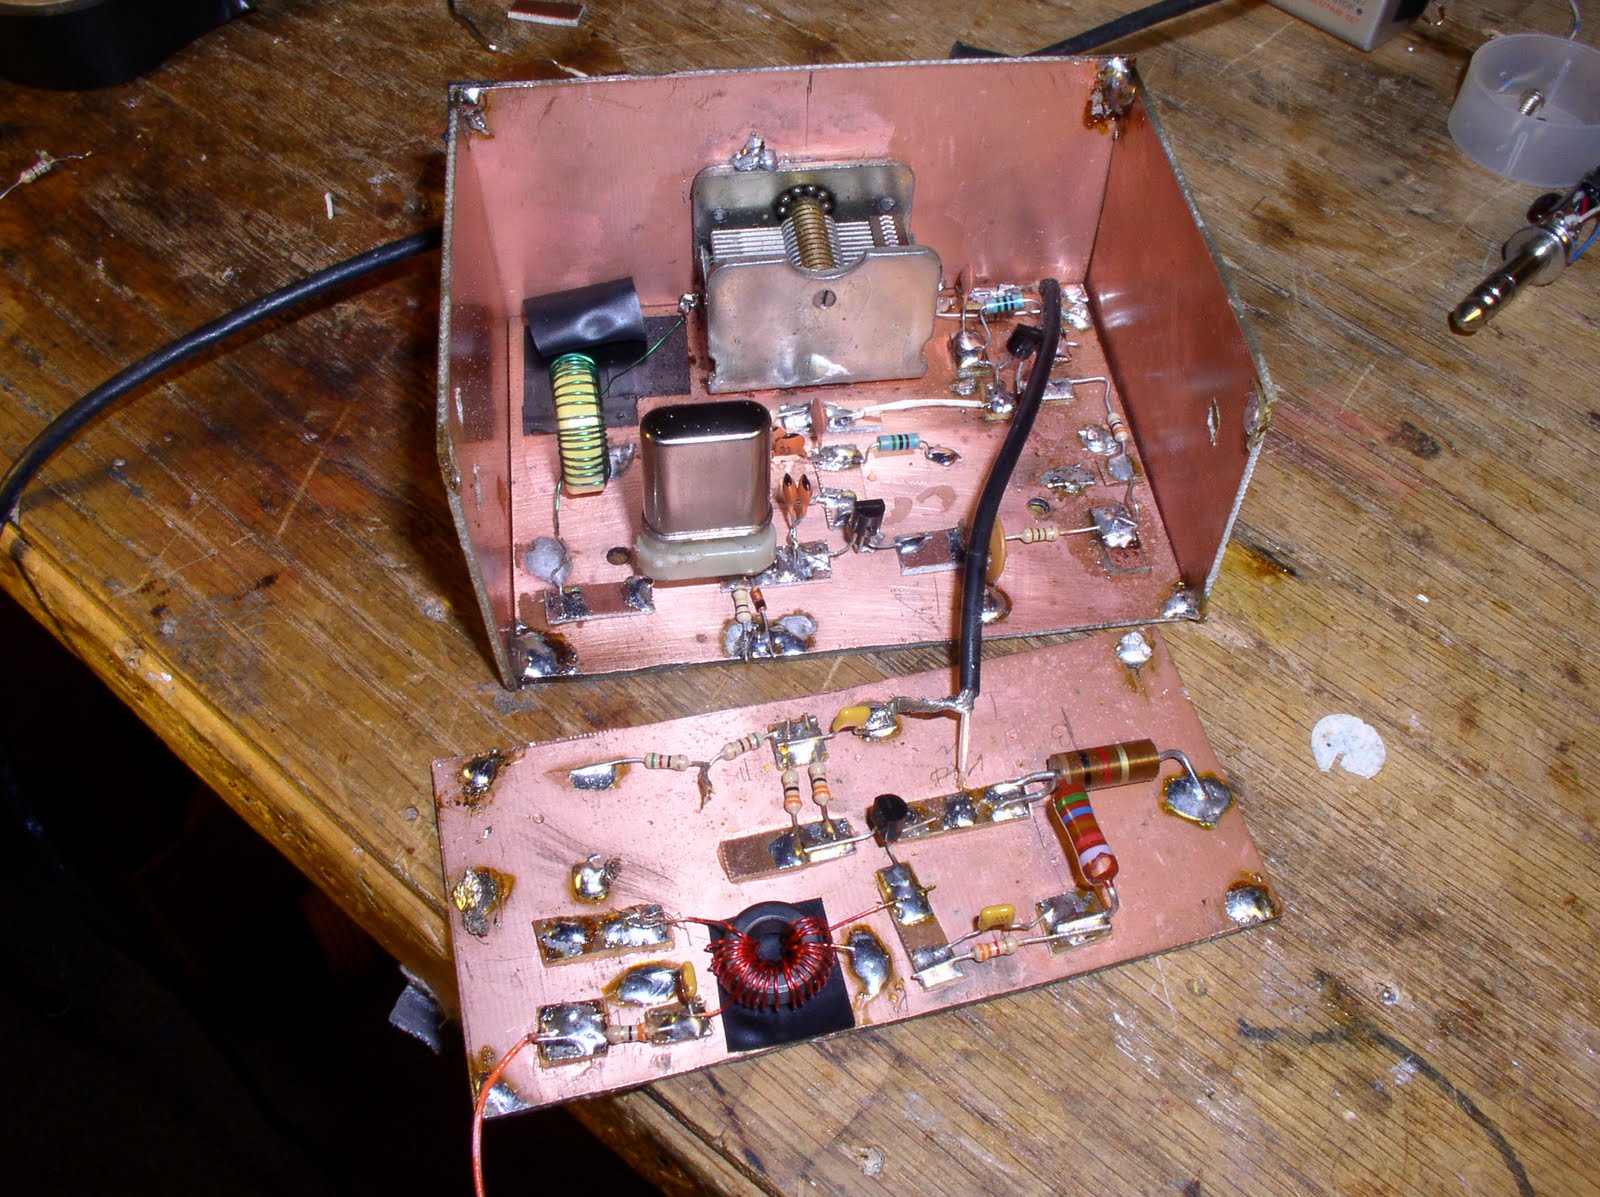
There is an old saying in Spanish:  "No hay mal que por bien no venga."   More or less this is the same idea as: "Every dark cloud has a silver lining."  Well, the dark cloud was my techno-agony with the parasitic oscillations (see my plea for h elp from yesterday).  The silver lining was the e-mail from Edgardo, LU1AR, in Buenos Aires that helped me get rid of them.    Edgardo advised putting a resistor across the primaries of the JBOT amplifier stages.  This is an old "lower the Q" trick, the idea being that lowering the Q might help prevent the amp from self-oscillating.     I used 680 ohm resistors.   First I put one across the primary of Q1.  No joy. Then Q2.  No luck.  Then I put one right across the primary of that big output transformer.  That did it!  The parasitics disappeared.   And I still get a nice 4 watts of output.  Thanks Edgardo.  I hope to make a contact with this rig today. 

The real silver lining in this story comes, however, in the form of Edgardo's blog site.  Wow, what an inspiring example of Argentinian Knack.  Radios, telescopes, auto-giros.  This guy is also into homebrew DSB rigs.  Wonderful stuff.  Check it out.  (Google will translate it for you, if necessary, but even if you don't read Spanish, the pictures tell most of the story.) 
I put this URL blog up on the SolderSmoke blog.  
Thanks to all who sent advice and encouragement.  Merry Christmas! 

--- On Sun, 12/23/12, lu1ar  wrote:

From: lu1ar
Subject: [BITX20] Re: JBOT taking off at 250 kHz
To: BITX20@yahoogroups.com
Date: Sunday, December 23, 2012, 9:56 PM


First. You must secure the RF decoupling of +B line. Use a bunch of small capacitors in paralell 1n and 100 nF with 22 uF electrolitic.
Second: Use 1Kohm resistor in paralell with primary of the transformers. Begin with the driver, then the 1st amplifier and then the output transformer.
Let us know results.
Regards.
Edgardo Maffia LU1AR
Buenos Aires - Argentina

--- In BITX20@yahoogroups.com, "iam74@..." wrote:
>


> --- In BITX20@yahoogroups.com, Bill Meara wrote:
> >
> > I'm building my FOURTH JBOT and this one is giving me more trouble than all the others combined.   I seek the help of the group. 
> > Here are the details of my tale of woe:
> > 20 meter rig.  Double Sideband.   The JBOT is fed by a simple two-diode, trifilar toroid singly balanced modulator.  NO DIPLEXER TO SPEAK OF.  At the output of the balanced modulator there is a 1000 uH choke to ground and a .001 uF cap to the input of the JBOT.  AF amp is an LM-386.  VXO is a very simple MPF-102 one stage ceramic resonator VXO with no buffer stage.  7 element low pass filter (three coils, four caps). 
> > All the transformers are wound on FT-37-43 cores.  T3 is four such cores stacked 2X2.
> >  
> > The arrangement works beautifully into a 50 ohm dummy load.  But as soon as I connect it to an antenna (a dipole out in the yard, fed with 50 ohm coax) the output signal gets ugly.  
> > Looking at it on the scope, instead of the nice figure eight pattern (similar to the two tone test pattern of SSB) I get ugly fuzzy outcroppings from the peaks.  Looking at the signal more closely I can see that in addition to the 14.2 Mhz signal, there is another LF oscillation at around 250 kHz. 
> > I've been struggling with this.  I can't get rid of the LF oscillations. The leads are all short and the inputs are far from the outputs.   I've beefed up shielding, and decoupling.  I've sacrificed a chicken to Papa Legba. Nothing seems to help.  
> > I THINK the feedback/oscillation is taking place in the JBOT itself -- not through the
> > audio amp or the balanced modulator or the VXO.
> > I watch the RF and the AF inputs to the balanced modulator to see if there is any difference between the stable situation (with the 50 ohm dummy load) and the unstable situation (with the antenna),  I don't see any differences. 
> > I even put an antenna tuner between the final and the antenna anb made sure that the antenna looks like 50 ohms non reactive.  This seems to help a bit, but the ugly instability is still there. 
> > Help me! 
> > 73  Bill N2CQR    
> >


Our book: "SolderSmoke -- Global Adventures in Wireless Electronics" http://soldersmoke.com/book.htm Our coffee mugs, T-Shirts, bumper stickers: http://www.cafepress.com/SolderSmoke Our Book Store: http://astore.amazon.com/contracross-20

Friday, March 9, 2012

JBOT Thoughts

Posted today to the BITX-20 Group:

Good to see so many JBOTs under construction. I recently built two of them. Farhan has asked me to share with the group my experiences using -43 core toroids. Ironically, TV cores are a bit harder to find here, so I had to go with the fancier toroids!


In my first amp (used in a 17 meter DSB rig) I used the smaller FT-37-43 cores in all three transformers. T1 and T2 were wound and placed in the same way that Farhan did with the TV cores. For T3 I used superglue to stack 4 of the cores 2x2, then wrapped them with a bit of electrical tape. I wound T3 so the input wires were on one side and the output on the other. (On this amp, I had started out using some large binocular cores from the junk box, but I had a tough time getting the amp stable with these cores, possibly because using them resulted in longer lead lengths. So I went back to the smaller FT-37-43 cores).

In the second amp (used in a 17 meter SINGLE Sideband rig) I used FT-50-43 cores for T1 and T2. The bigger gores were a little easier to work with. I glued them vertically to the copper clad board. For T3, I again went with 4 FT-37-43 cores. (I tried using 4 FT-50-43 cores for T-3, but I found that output was low, so I went back to the smaller cores for T3). Note that on the second amp, I put some insulation between the heatsinks and the copper clad board (gorilla tape) -- I was worried about possible short to ground if the anodized layer on the heatsinks got breached.

In building my amps, I used the photo on Farhan's Phonestack page as my guide.

As is always the case with amps that I build, I found that a certain amount of "taming of the beast" had to take place before I got the devices stable. This is certainly the result of the kind of homebrew devices into which they are being inserted! Following advice from Doug DeMaw, I made liberal use of ferrite beads. I put one on the lead carrying 12 volts to the amp board. I put another on the lead from the 12 volt line to the final's RF choke. And I put one on the line carrying the .6 volt bias to the secondary center tap of T2.

I put a bit of shielding (copper-clad board) between the low pass filter and T3.

These steps allowed these amps to work nicely with my contraptions.

As long as we are talking about JBOTS, I have a question for the group:

On my second amp, I noticed that the output was a bit lower than it should have been -- only about 1.5 watts. I did a lot of troubleshooting, then I finally checked the bias currents in the first two stages. I found that BOTH were running at about 50 ma.

I looked at Farhan's JBOT notes and found that the second stage is supposed to be running at 100 ma. I found that the base bias voltage on the second stage was 1.13 volts, while the first stage had 1.9 volts on the base. That didn't seem right.

I then turned to the bias.exe program that comes with EMRFD. I plugged in the values from the JBOT schematic and, sure enough, the predicted collector bias current was 50 ma, not the 100ma the design was looking for.

Using that program, I made some changes to the base resistor in the second stage. I found that with 150 ohms instead of 100 ohms, the collector bias current goes up to the desired 100 ohms. This also seemed to bring power output up to the desired range of 3-4 watts (output should be a bit lower at 18 MHz, right?)

More info (and pictures) on my JBOT adventures can be found here:
http://soldersmoke.blogspot.com/search/label/JBOT

GOOD LUCK WITH YOUR JBOTS!

73 Bill N2CQR
http://soldersmoke.blogspot.com

Our book: "SolderSmoke -- Global Adventures in Wireless Electronics"http://soldersmoke.com/book.htmOur coffee mugs, T-Shirts, bumper stickers: http://www.cafepress.com/SolderSmokeOur Book Store: http://astore.amazon.com/contracross-20

Sunday, December 23, 2012

Woe is me! Why Podcast is Late: Parasitic Oscillations!


I'm building my FOURTH JBOT and this one is giving me more trouble than all the others combined.  
Here are the details of my tale of woe:
20 meter rig.  Double Sideband.   The JBOT is fed by a simple two-diode, trifilar toroid singly balanced modulator.  NO DIPLEXER TO SPEAK OF.  At the output of the balanced modulator there is a 1000 uH choke to ground and a .001 uF cap to the input of the JBOT.  AF amp is an LM-386.  VXO is a very simple MPF-102 one stage ceramic resonator VXO with no buffer stage.  7 element low pass filter (three coils, four caps). 
All the transformers are wound on FT-37-43 cores.  T3 is four such cores stacked 2X2.
 
The arrangement works beautifully into a 50 ohm dummy load.  But as soon as I connect it to an antenna (a dipole out in the yard, fed with 50 ohm coax) the output signal gets ugly.  
Looking at it on the scope, instead of the nice figure eight pattern (similar to the two tone test pattern of SSB) I get ugly fuzzy outcroppings from the peaks.  Looking at the signal more closely I can see that in addition to the 14.2 Mhz signal, there is another LF oscillation at around 250 kHz. 
I've been struggling with this.  I can't get rid of the LF oscillations. The leads are all short and the inputs are far from the outputs.   I've beefed up shielding, and decoupling.  I've sacrificed a chicken to Papa Legba. Nothing seems to help.  
I THINK the feedback/oscillation is taking place in the JBOT itself -- not through the
audio amp or the balanced modulator or the VXO.
I watch the RF and the AF inputs to the balanced modulator to see if there is any difference between the stable situation (with the 50 ohm dummy load) and the unstable situation (with the antenna),  I don't see any differences. 
I even put an antenna tuner between the final and the antenna anb made sure that the antenna looks like 50 ohms non reactive.  This seems to help a bit, but the ugly instability is still there. 
Help me! 
\


Our book: "SolderSmoke -- Global Adventures in Wireless Electronics" http://soldersmoke.com/book.htm Our coffee mugs, T-Shirts, bumper stickers: http://www.cafepress.com/SolderSmoke Our Book Store: http://astore.amazon.com/contracross-20

Saturday, January 21, 2012

JBOT Installed in Azores 17 Meter SSB Rig

Even though one of their Coronal Mass Ejections is due to hit us soon, the radio gods have been quite kind to me this morning. I installed the JBOT amplifier board in the 17 meter SSB transmitter that I had built out in the Azores during the last solar cycle. The board went in without any trouble. And I was a very surprised when it DIDN'T break into oscillation and instability! Holy Cow! This one was stable from the start! Even when connected to my antenna! Eureka!

The rig still needs some peaking and tweaking. I'm only getting about 2-3 watts out and I should be getting 4-5. I did a quick and dirty "by ear" alignment --- I just listened to my own signal with my trusty Drake 2-B and moved the carrier oscillator freq around a bit until the SSB audio sounded good (you never have to do that with DSB!).


For those of you not familiar with this rig, here is some background:
-- Built on the chassis of an old Heath DX-40
-- Crystal filter at 5.174 MHz. Filter rocks and carrier oscillator rocks from an old Swan 240 I picked up in the Dominican Republic from Pericles Perdomo HI8P (SK).
-- Based on a design published in SPRAT by Frank Lee, G3YCC (SK).
--Heterodyne oscillator is a G3RJV Universal VXO circuit running at around 23.3 MHz.
-- That orange cord to the big meter that you are no doubt wondering about is just a little circuit that monitors total current drawn by the rig. It bounces up and down as I talk. I put it in there mostly because I wanted to make use of a beautiful old Simpson meter that I picked up in 1973 at the Crystal Radio Club (W2DMC) in Valley Cottage, New York.


Going around, clockwise from below the meter: G3RJV VXO, carrier oscillator and two diode balanced modulator board, crystal filter (with NE602 mixer and post-filter bandpass filter to the left), JBOT PA. Audio amp (using op amp) below the chassis. T/R relay in the center (antenna changeover relay below the chassis).

Our book: "SolderSmoke -- Global Adventures in Wireless Electronics"http://soldersmoke.com/book.htmOur coffee mugs, T-Shirts, bumper stickers: http://www.cafepress.com/SolderSmokeOur Book Store: http://astore.amazon.com/contracross-20

Wednesday, October 19, 2011

Oh No! Short Circuit Danger with Anodized Heat Sinks?

Our friend Brent out in Minneapolis sent me some pre-Halloween HB frights yesterday. I'm still concerned. Am I living dangerously with my anodized but collector-connected heat sinks glued to the ground plane?
What say the HB gurus?

--- On Tue, 10/18/11, KD0GLS wrote:

From: KD0GLS Subject: Re: JBOT Amp
To: "Bill Meara"
Date: Tuesday, October 18, 2011, 9:38 PM

Bill,

Well, it is nearly Halloween, but it wasn't my intention to frighten you!

I think it's hard to argue with the fact that it works as-is. The heatsinks you bought look like common anodized aluminum to me. Out of curiosity I dug a couple of similar ones out of my parts bins and measured them. I found exactly what you did - wide open on the surface, and, not surprisingly, a dead short just underneath. I've always assumed that anodize finish was metallic and conductive, but now I know otherwise. I like to learn at least one new thing each day, so thanks for providing today's opportunity!

The clearances are no doubt small, but I think with the low voltages present in your circuit you'll probably be fine. The only potential problem might be if movement or vibration might someday break through that coating. I'd certainly recommend a fuse in the power supply line if you don't already have one.

Anyway, it looks great sitting there in the middle of your old rig. It's inspiring.

Brent


On Oct 18, 2011, at 19:42, Bill Meara wrote:

Brent: You scared me with your question but I think what I did is OK. Maybe. I looked more carefully at the clip on heat sinks I bought. They are covered with a non-conductive coating, but f I scratch them up a bit I can reach the conducting part. So i guess you just have to treat them gently if you intend (as I did) to super-glue them to the PC board. I notice that Farhan did the same thing (see his JBOT page) so I guess I'm OK. I put some heat sink compound in there too. And then there is the super glue. I have no short circuits from the collectors. I guess I could have used a Dremmel to isolate the copper just below the transistors. Or I could have put some mica between the heat sinks and the boards.

The sinks are deeper than the transistors, so there is no direct contact between the top of the transistor and the PC board.

What do you think?
--- On Tue, 10/18/11, KD0GLS wrote:

From: KD0GLS >
Subject: JBOT Amp
To: "Meara Bill" >
Date: Tuesday, October 18, 2011, 5:27 PM

Bill,

The amp looks mighty FB, and maybe I should try it as well. But I'm curious how you've insulated the collectors of all those transistors from the ground plane. From the picture, it looks like all of the metal heat sinks are sitting right on the ground plane copper.

.73,
Brent, KD0GLS, Minneapolis

Our book: "SolderSmoke -- Global Adventures in Wireless Electronics"http://soldersmoke.com/book.htmOur coffee mugs, T-Shirts, bumper stickers: http://www.cafepress.com/SolderSmokeOur Book Store: http://astore.amazon.com/contracross-20

Thursday, November 10, 2011

JBOT Amplifier Installed in Azorean DSB Rig

I've been remiss in posting to the blog, but I have a good excuse: I've been melting solder. I have working on the installation of my new Farhan-designed JBOT amplifier in my old Azorean DSB transceiver. I'm really enjoying this project, and I now see it as the first in a series. My shack has a number of creations that were built during the peak years of the last solar cycle, but have since fallen into disuse. Many of them were partially cannibalized -- usually it was the RF amplifier that was taken out. The JBOT was just what I needed. I plan to refurbish all of these rigs, adding a bit of India to each one of them. This is very much in keeping with our "International Brotherhood of Electronic Wizards" ethos.

The installation went fairly well, but with all of the ups and downs that accompany this kind of project. The amp worked fine on the bench, fed with a signal generator and into a dummy load. But of course, life got more complicated when I installed it in the rig. Yes, it took off on me. This was no fault of the amplifier -- I just needed to add some additional shielding. It is working fine now. See above. I moved it out of center stage and put it off in the corner to avoid feedback problems. More discussion of this in the next podcast (maybe this weekend).

Our book: "SolderSmoke -- Global Adventures in Wireless Electronics"http://soldersmoke.com/book.htmOur coffee mugs, T-Shirts, bumper stickers: http://www.cafepress.com/SolderSmokeOur Book Store: http://astore.amazon.com/contracross-20

Tuesday, October 18, 2011

My JBOT 5 Watt Linear (Farhan's Design)

There it is -- my version of Farhan's JBOT 5 watt linear amplifier. JBOT stands for "Just a Bunch of Transistors." But I think Farhan is being modest. I really like the design, especially the effort to make this something that hams around the world can reproduce from readily available parts. For example, Farhan's original version used TV balun cores for the transformers. I didn't have any of those around, but I found three "mystery spec" binocular cores in my junk box. They seem to be working just fine. (I tested them a bit: Farhan had written that FT 37-43 cores would work. T1 has seven turns trifilar. Seven turns on my mystery cores yielded 13uH. On an FT 37-43 core 7 turns yields around 20 uH. Close enough -- these are, after all, broadband transformers.)

Note how closely my build follows Farhan's schematic (which you can see in the background). When building this circuit, I just kept Farhan's web page on my computer screen, and scrolled up and down from his schematic to the photo of his version.

This is the first linear amplifier that worked the first time I powered it up. It didn't release any smoke, or leave transistor burn tattoos on fingers, or try to be a 14MHz oscillator.

This version is going into my Azores-built 17 meter DSB transceiver. See how nice it fits:

Our book: "SolderSmoke -- Global Adventures in Wireless Electronics"http://soldersmoke.com/book.htmOur coffee mugs, T-Shirts, bumper stickers: http://www.cafepress.com/SolderSmokeOur Book Store: http://astore.amazon.com/contracross-20

Tuesday, January 17, 2012

Another JBOT Amplifier

Over the weekend I built another JBOT 5 watt linear amplifier (design by Farhan). I used a nice piece of copper-clad board that Dave, W8NF, sent me (thanks again Dave).

This time I chickened out regarding the possible conductivity of the anodized heat sinks. I didn't have any trouble with this on my first JBOT, but I worried that if the anodized layer gets flaked away, a heat sink might short one of those collectors to ground. To be on the safe side, I put small squares of Gorilla Tape on under the heat sinks. (PLEASE don't tell me that Gorilla Tape is conductive!)

For T1 and T2 I used FT50-43 toroids instead of the TV baluns used by Farhan. He had recommended FT37-43's as an alternative to the TV baluns, but I went with the slightly larger toroids. For T3 I rolled my own binocular core using four FT37-43 toroids stacked 2X2.

The amplifier has passed the smoke test. Next I have to put in the low pass filter (Steve Smith: Please note that I have left space on the board for the filter.) Then this version will face its real test when it goes into the 17 meter Azores SINGLE sideband rig.

Our book: "SolderSmoke -- Global Adventures in Wireless Electronics"http://soldersmoke.com/book.htmOur coffee mugs, T-Shirts, bumper stickers: http://www.cafepress.com/SolderSmokeOur Book Store: http://astore.amazon.com/contracross-20

Monday, October 31, 2011

Pumpkin Pi and JBOT Gremlins

Maria wanted to go with a mathematical theme for this year's Jack-0-Lantern. Pumpkin Pi!

I have been chasing some gremlins and banshees around my old Azores 17 meter DSB rig. The JBOT Amp worked fine into a dummy load, but of course things got a bit more complicated when I put it into the rig and connected it to an antenna. It would take off (like a banshee!) if the load was at all reactive. I think this is the result of inadequate shielding and inputs a bit too close to outputs. But it all settles down nicely when I put a transmatch in the antenna line and tune out the reactance. I may just leave it this way.

Output is a bit low -- only about 1 Watt. I realize that at 18 MHz output should be dropping a bit, but I think I should be getting more. I THINK I'm giving it the recommended 1 milliwatt input. At some point I think Farhan mentioned the possible need to experiment with the number of turns on the secondary of the output transformer....

Our book: "SolderSmoke -- Global Adventures in Wireless Electronics"http://soldersmoke.com/book.htmOur coffee mugs, T-Shirts, bumper stickers: http://www.cafepress.com/SolderSmokeOur Book Store: http://astore.amazon.com/contracross-20

Tuesday, January 24, 2012

Toroidal Transformers: Does Size Matter?

I continue to tweak and peak the JBOT amplifier in the Azores 17 SSB transmitter. On this version I used some FT-50-43 toroidal cores instead of the smaller FT-37-43 cores recommended by Farhan. This morning I was experimenting with the output transformer. I seem to get noticeably more output with a transformer made with four FT-37-43 cores than I do with one made with four larger FT-50-43 cores.

I noticed something similar on my previous JBOT: performance improved when I switched from some relatively large binocular cores and went to the recommended FT-37-43.

So, what do you guys think? Could there be lower losses using the smaller cores? Any other reason why the smaller transformers seem to be doing better?

Our book: "SolderSmoke -- Global Adventures in Wireless Electronics"http://soldersmoke.com/book.htmOur coffee mugs, T-Shirts, bumper stickers: http://www.cafepress.com/SolderSmokeOur Book Store: http://astore.amazon.com/contracross-20

Monday, July 6, 2009

Links from #111: W7ZOI, VU3ICQ, AA1TJ

Here is the excellent discussion of bi-directional amps I mentioned. From the web site of W7ZOI:
http://w7zoi.net/Bidirectional%20Matched%20Amplifier.pdf

Here is Farhan's new JBOT 5 watt final amplifier:
http://www.phonestack.com/farhan/jbot.html

Here is the mysterious (and perhaps diabolical) Xtaflex from AA1TJ (the first rig EVER to promise "buns of steel.")
http://mjrainey.googlepages.com/xtaflex

Monday, October 17, 2011

My JBOT passes the Smoke Test

Over the weekend I built my first version of Farhan's JBOT. I really enjoyed building it. I soldered in the last connections this morning and I am happy to report that it passed the smoke test. More info (and a picture) tomorrow. Thanks Farhan!

Our book: "SolderSmoke -- Global Adventures in Wireless Electronics"http://soldersmoke.com/book.htmOur coffee mugs, T-Shirts, bumper stickers: http://www.cafepress.com/SolderSmokeOur Book Store: http://astore.amazon.com/contracross-20

Thursday, November 17, 2011

Amplifier Woes -- Help me! Help me!

When I look in the mirror and I see a haunted, obsessed look in my eyes. My wife senses that there is something wrong in the ham shack. She is right. I have an amplifier that wants to be an oscillator. Help me exorcise these gremlins! Guys, this problem is holding up the production of the next SolderSmoke podcast.

My JBOT amp works fine into a dummy load, but when I connect it to an antenna, it gets unstable. Here are some more details of the symptoms:

I am running the JBOT with a 5 element (two toroids, 3 caps) low pass filter (designed by Doug DeMaw and approved by Steve Smith).

With the antenna connected, all is well UNTIL I raise the power out (by varying the input) beyond about 1 watt. Below one watt, the amp is working fine, and it stable. As soon as I hit the 1 watt point, the amplifier seems to break into oscillation. This does not happen into the dummy load.

The antenna is a simple dipole fed by coax. It shows a low SWR. Even when I put an antenna tuner between the amp and the antenna and bring the SWR down to negligible levels, the instability problem persists.

With the amp disconnected from all other circuitry other than the antenna and the power supply, if I just touch the input capacitor, it breaks into oscillation. This does not happen when the amp is working into the dummy load.

I've bolstered the power supply filtering and decoupling. No luck. I tried some de-Qing of the transformers. No luck.

Any suggestions?


Our book: "SolderSmoke -- Global Adventures in Wireless Electronics"http://soldersmoke.com/book.htmOur coffee mugs, T-Shirts, bumper stickers: http://www.cafepress.com/SolderSmokeOur Book Store: http://astore.amazon.com/contracross-20

Thursday, December 1, 2011

Secret Listeners -- The Voluntary Interceptors

Jim, AL7RV, and several others sent me the link to this really interesting video about the British radio amateurs in WWII. Real "stiff upper lip" spirit in this video. Musn't grumble! Great stuff from Great Britain: http://www.eafa.org.uk/catalogue/5108

That regen receiver they showed looks a lot like the beast that I brought back from the UK with me. Once again, I am hearing the siren song of the diabolical regens....

Progress continues on my Indian-ized Azorean DSB transceiver (with JBOT amp). I now have the amp nicely stabilized (thank God!). Now I just need to get the output from the balanced mod close to the 1 mW PEP level needed by the amp. Should be done soon. And my cold seems to be going away, so maybe I'll be able to share my tales of JBOT derring-do in a podcast this weekend.

Our book: "SolderSmoke -- Global Adventures in Wireless Electronics"http://soldersmoke.com/book.htmOur coffee mugs, T-Shirts, bumper stickers: http://www.cafepress.com/SolderSmokeOur Book Store: http://astore.amazon.com/contracross-20

Tuesday, January 4, 2022

Exorcism Completed! Getting Rid of the Spur in my 17 meter SSB Transmitter using a TinySA (video)

To re-cap:  The problem became evident when trying to "net" or "spot" my transmitter onto my receive frequency.  Around 18.116 MHz, I could hear at least two tones in the receiver as I moved the transmitter frequency.  I needed to get rid of the extra tone. 

First, thanks to all who sent in suggestions.  They came in literally from around the world, and this is a demonstration of the IBEW in action.  I used or at least tried all of them.  They were all good ideas. 

Following Vasily Ivananeko's pseudonymous suggestion I rebuilt the carrier oscillator (apologies to G3YCC).  I used the carrier oscillator/buffer circuit from Farhan's BITX20.   

Henk PA0EME said I should look at the signal level at the input ports of the NE602 mixer.  Henk was right --- the VXO input was far too high.  I lowered it, but the problem persisted. 

At first, I thought that the spur in question was so small that it would not show up on the air.  I could not see it in the TX output using my TinySA spectrum analyzer.  That was good news and bad news:  Good that it was not showing up on the air, bad that I could not see it in the TinySA and use that image in the exorcism. 

At first I thought that the spur was being caused by the 10th harmonic of the carrier oscillator and the third harmonic of the VXO.  This seemed to fit.  So, following VK3YE's sage advice, I built a little 69 MHz series LC trap (using a coil sent by AA1TJ, on a board CNC'd by Pete N6QW).  That trap succeeded spectacularly in crushing the 10 harmonic.  Look at these before and after shots on the TinySA: 

Before Trap

After Trap

Spectacular right? But guess what?  The problem was still there.  

I scrutinized the situation once more. I realized that the spur would be more visible if I put the TinySA on the input of the transmitter's PA (a JBOT amp designed by Farhan) as opposed to putting it on the output.  Watching the spur and the needed signal move in the TinySA as I tuned the VXO, I realized that they were moving in opposite directions.  This indicated that the spur was the result of a carrier oscillator harmonic MINUS a VXO-generated frequency (as the VXO frequency increased, the spur frequency decreased).  Looking at my EXCEL spread sheet, I could see it:  8th harmonic of the carrier oscillator MINUS the main output of the VXO. 

To confirm this, I plugged the values into W7ZOI's Spurtune program.  Yes, the spur popped up and  moved as predicted.  

For further confirmation I shut down the carrier oscillator by pulling the crystal from the socket, and then just clipped in a 5.176 MHz signal from my HP-8640B signal generator (thanks KB3SII and W2DAB). Boom!  On the TinySA, the spur disappeared.  Now I at least knew what the problem was:  a harmonic from the carrier oscillator.  

Following good troubleshooting practice, I turned off the gear and went to bed.  When I woke up, an idea came to me:  Before launching into a lot of filtering and shielding, just try running the carrier oscillator at a lower voltage, seeing if doing so might reduce the harmonic output.   I disconnected the carrier oscillator board from the main supply and clipped in a variable voltage bench supply.   Watching the signal on my TinySA, I watched as the spur completely disappeared as I reduced the voltage from around 13V to 10V  (see video above).  The main signal frequency level did not change much.  I tested this by listening for the hated extra tones.  They were gone.  Exorcised.  

Key lessons: 

-- Spur problems are difficult to troubleshoot.  Armstrong's superhet architecture is, of course, great, but this is definitely one of the pitfalls.  Single conversion makes life easier.  IF selection is very important. Choose wisely! 

-- When looking at the TinySA as you tune the rig, pay attention to which way the spur is moving.  This provides an important clue regarding the combination of harmonic you are dealing with. 

-- The TinySA is a very useful tool.  It seems like it is easier to use than the NanoVNA (which is also a fantastic tool). 

-- It can be fun and rewarding to re-visit old projects.  In the years between original construction and the re-look, new test gear has become available, and the skill and experience of the builder has improved.  So problems that once seemed insurmountable become fix-able. 

-- Thinking through a problem and thinking about possible solutions is very important.  It pays to step away from the bench to think and rest.  Rome wasn't built in a day. Here's a rough block diagram that I drew up (noodled!) while trying to figure out this problem: 

Sunday, November 13, 2011

Backyard Solar Astronomy

Over the weekend I took a break from JBOT amplifiers and did something I've been meaning to do for a long time: solar astronomy. I pulled out my old 4.5 inch Tasco reflector telescope and aimed it at old sol. I know, I know, this can be dangerous, but we were careful -- note that Billy is standing on the other side of the business end of the telescope. In his hands is the paper onto which we projected the solar image. I'd always wondered how I would get the sun into the telescope's field of view without risking my eyesight by using the finder scope. This turned out to be no trouble at all: I just looked at the shadow cast by the tube of the telescope and --using the shadow as my guide -- moved the tube until it was lined up with the sun. We snapped a picture of our results. I think our crude effort compared very favorably with the picture from NASA's Solar Dynamics Observatory. You can see the same sunspots in each image (ours is reversed because we were using a reflector). These images are from 12 November 2011.

Our picture


NASA's picture

Our book: "SolderSmoke -- Global Adventures in Wireless Electronics"http://soldersmoke.com/book.htmOur coffee mugs, T-Shirts, bumper stickers: http://www.cafepress.com/SolderSmokeOur Book Store: http://astore.amazon.com/contracross-20

Saturday, December 24, 2011

DSB QRP DX on 17

The solar flux index is now above 131 and the effects are very apparent on 17 meters. (I will pull out the telescope this morning to get some direct confirmation of improved solar conditions!) This morning I worked Daniel, F5BBD, with my little DSB rig with the 5 watt JBOT amplifier. Very solid contact. He gave me a 55. I hear Japanese stations in the evening. And I am hearing guys on 17 who I haven't heard since the last solar cycle: My friend Chris SM0OWX seems to be right where he was when we last spoke.

Our book: "SolderSmoke -- Global Adventures in Wireless Electronics"http://soldersmoke.com/book.htmOur coffee mugs, T-Shirts, bumper stickers: http://www.cafepress.com/SolderSmokeOur Book Store: http://astore.amazon.com/contracross-20

Wednesday, October 26, 2011

Azorean Oscillator Re-build

With my JBOT amp ready for installation, it was time to go back and check out the rest of the circuitry on my old Azorean DSB/Direct Conversion 17 meter "Magic Carpet" transceiver. I was surprised to find that the oscillator, well, wouldn't oscillate. The MPF102 that I had in the main oscillator circuit was blown. I suspect voltage spikes from the T/R relay. I installed the required diode across the relay coil. (I seem to blow up a lot of MPF102s. Is it just me, or are these devices really fragile? They are junction FETs, not MOSFETS, so I thought of them as being more robust. But I seem to go through a lot of them.)

After messing around with the oscillator and buffer circuits, the nice clean Manhattan isolation pads that had been there at the start were all messed up, with big piles of solder with the ends of multiple axial leads stuck in there. I decided to start afresh. Out came the little PCB box that housed that housed the oscillator, buffer and amp stages. Off came the walls of the box. (When I built this thing the first time, I didn't realize that I would need an amp to get to the 7 dbm needed to drive the diode ring. I ran out of room on the main board and ended up building the needed amplifier on the back wall of the box!)

So I got to build this little circuit again, ten years and three countries after the original build. It was fun. I like building oscillators. There is that satisfying sense of closure and completion when, at the end of the effort, you turn on your receiver and hear the tone from your creation.

There was also a fun little bit of troubleshooting. After rebuilding the oscillator circuit I noticed that applying power to the "on the wall" amplifier caused the oscillator to shut down. At the buffer, I was seeing RF in and RF out, but the whole thing would shut down when I powered up the next stage. Obviously there wasn't a lot of BUFFERING going on! Sure enough, the MPF102 was bad. I replaced it from my dwindling supply, and all was right with the universe.

Now the amp goes in. But first I will build the low pass filter. I promise.

Our book: "SolderSmoke -- Global Adventures in Wireless Electronics"http://soldersmoke.com/book.htmOur coffee mugs, T-Shirts, bumper stickers: http://www.cafepress.com/SolderSmokeOur Book Store: http://astore.amazon.com/contracross-20

Sunday, January 15, 2012

Sunspots: As Good As It's Going to Get

The good news is that conditions are not a lot better than they have been. The bad news is that they won't be getting much better. But take heart guys: the next few years should be pretty good. Now is the time to get those rigs and antennas for the upper HF bands in shape. Construction of a second 17 meter JBOT amplifier begins today (this one for the Azores SSB transmitter).

Our book: "SolderSmoke -- Global Adventures in Wireless Electronics"http://soldersmoke.com/book.htmOur coffee mugs, T-Shirts, bumper stickers: http://www.cafepress.com/SolderSmokeOur Book Store: http://astore.amazon.com/contracross-20

Tuesday, March 5, 2024

A Contact with my Old Azorean DSB Transceiver


I've been thinking about balanced modulators, and I wanted to see how some of my early circuits performed.  So I pulled this OLD Double Sideband rig off the shelf and fired it up. The balanced modulator -- and everything else! - worked fine,  and I soon made contact on 17 meter SSB with Gene, AB9GK. 

This was the first DSB transceiver that I ever built.  I made this out in the Azores, probably in 2000 or 2001.  Years later I had replaced the RF power amplifier with a "JBOT" (Just a Bunch of Transistors) designed by Farhan.  

Over on my YouTube channel a comment came in from my friend Jack:  

"Looking inside and seeing the o-scope probe in place while the radio was on the air reminded me of neurosurgery where the patient is awake and talking while the surgeon probes different brain regions soliciting feedback. Sure, ham radio isn't neurosurgery, but it's not too far at times. Also, you already have rocket science covered."


Here is an article about my build of that first rig:


I think the article captures well the trials and tribulations faced by new homebrewers, perhaps with the twist that comes from being out in the middle of the Atlantic ocean.  

Mike WU2D is having similar fun with his homebrew 10 meter DSB transceiver: 

I was struck by how similar Mike's early QSO experiences were with mine.  We both put our DSB transmitters on the air before they made their way into real cabinets or boxes. 

Here's mine from 2001 in the Azores: 


Designer: Douglas Bowman | Dimodifikasi oleh Abdul Munir Original Posting Rounders 3 Column