Podcasting since 2005! Listen to Latest SolderSmoke

Saturday, May 4, 2024

W4YWA's Homebrew Rig on 20 Meters


Ed W4YWA is far too modest -- he has built a very FB homewbrew transmitter.  Congratulations Ed.  I think your original plan to use a Web SDR receiver will work, if you and the other station are just willing to pause for an additional second or two to let the internet catch up with the real world.  Also, you might find some Web SDRs that have less latency than other.  You could used a little SW receiver or a simple buzzer for your sidetone ( I think sidetone is your most pressing latency concern.)   My suggestion is to try to get a few contacts using the Web SDR (perhaps via schedule -- try the DX Summit or the SKCC web page to set some up). Then build yourself a simple Direct Conversion receiver to use with this rig.  You don't have to try to build a VFO at 14 MHz (that can be difficult) -- you could build one at 7 MHz (use the circuit from our High School receiver project) and pair it up with a "Subharmonic Mixer" so that you can tune the 20 meter band.  Please keep us posted on your progress. 

Ed writes: 

Home-Brew Fun and Failures 


I’m not much of an amateur radio operator, but I enjoy the electronics, self leaning, and the home brewing aspects of our hobby. Here’s an account of a recent effort. While trying to re-learn CW, I discovered web-based SDR sites with waterfall displays, all kinds of filtering and better performance than any of my vintage station receivers. So, I start thinking….. if I had a little transmitter and a simple antenna, along with internet access, I’d have a capable station to take on vacations to the beach. Yes I know, there are web based amateur radio stations, but remember the operative words here are: “Home Brew.” After pinging the Google machine, I came up with a two-stage 1-1/2 watt transmitter sometimes refereed to as the “Universal QRP transmitter,” or the “Little Joe Transmitter.” There’s lots of variations of this circuit but it is essentially a Colpits crystal oscillator coupled to a class-C PA. I chose 20 meters because I didn’t want to hire an arborist to string my antenna. My design modifications included a transistor switch that keys both the oscillator and PA, a VXO circuit, power transistor protection, and a 5-th order Chebychev low pass filter.

Notice the (do I dare say, good looking?) enclosure. In a former life, it was a SD card reader from a defunct PC. FYI, gutted CD/DVR drive cases also make fine enclosures for your home brew projects. I opted for a “foil side up – without holes” for my PCB design. All the parts are soldered down on the lands - no PCB holes. I wanted to change parts without having to do open heart surgery. Functional placement was also important to me. I took more time than I’d like to admit to organize the circuit layout as I did, but I’m glad I did.


When all was said and done, it was time to power it up and….. and …. nothing! Not a single function worked! I won’t bore you with the debug stories that took forever, but the only part I didn’t have in my junk box was the PA transistor. I got 10 of them for $5 off the Internets and they all failed to deliver. I could only get a few tenths of a watt from my design. In a fit of desperation, I un-soldered a PA transistor from an old CB radio and it immediately gave me 1.8 watts of pure CW ! ! ! ! Happy dance, happy dance! But, save your accolades. There were lots of other problems; they were my problems not component issues. For example, before you design your own RF filter be sure you understand cutoff frequencies. They are not the same for every filter design. I suggest Paul Harden’s NA5N site to learn about PA output filters. My first few filter attempts had the transmit frequency well down on the attenuation curve. I was attenuating my own signal ! So, after weeks of “why don’t the damn thing work,” I got a clean signal. Whoo-Hoo!


Now it was time to unshackle the dummy load and see where I can be heard. And, Oh boy… I’m beaming into Pennsylvania, Georgia and Northern VA, all from an inverted V on a tripod mounted paint stick, held apart with two tent stakes. But then, reality took over. My grandioso plans for using the web-based SDRs as a station receiver (and the side tone oscillator for my transmitter) didn’t account for the latency delays of the SDR software. If you ever listened talk radio and the host says, “Turn your radio off – the delay will make you sound like a ….” you know what I’m talking about. You would think that someone who over thinks everything, would have foreseen this issue before spending countless hours of breathing solder fumes? Humility and eating crow are my better traits. But not to worry, I’m not ready to give up. Stay tuned for more adventures of Home-Brew Fun and Failures. 

73s W4YWA

Thursday, May 2, 2024

Chuck Adams' Modification of the MXM Simple Transceiver -- An Early QSO with the MXM Thirty Years Ago

Click for a better view

Esteemed Homebrew Hero Chuck Adams AA7FO saw me struggling with the T/R switch on my hamfest-found MXM SupeRX/TX transceiver. Chuck kindly sent me a modification of the circuit that allowed for automatic T/R.  I see it also envisioned the use of a VFO.  We are not sure if this version of the MXM transceiver ever made it to market, but it certainly would -- in any case -- be of interest to homebrewers.  

Chuck wrote: 

Attached is a schematic I drew for Bruce almost 30 years ago with a program that I wrote.  This is for the Simple Transceiver where Bruce and I worked out the solid state switch to replace the slide switches you have to use to switch between receive and transmit.

BTW.  MXM stand for 1990, the year Bruce started his kit adventures.  I worked Bruce on the first beta build of the transceiver Denton TX to Smithville TX on 40m during the day.


Thanks a lot Chuck.  

Wednesday, May 1, 2024

KE5HPY Builds a QRP Transmitter


FB Chuck, very cool.  Please send us more reports on this rig.  
Chuck has been on the blog many times, with many projects: 
73  Bill 
-------------

Bill/Pete:


Thought you would appreciate a recent project inspired by the fabulous EMRFD.  This started as a test bed W7ZOI universal tx to evaluate my stock of RF BJTs and employ some FT-243s in the shack.  That was interesting by itself but the 16-32 dBm output (choice of device really matters!) did not reach the intended targets using my 40m dipole.  So, add a W7EL RF PA and a nifty, clean 7W emerges after damping output from Q2.  The final is pleasantly efficient and needs only a modest heatsink to survive key down for 60 seconds.  KFS then reported S7-9.  Success.  Time to box it up and go XTO, add a meter output at 30dB down and an RF driven LED indicator.  Left room to add an ATtiny85 CQ keyer but ran out of time.  Had to move house and knock down my 40-6m antennas.  That was the most painful part of moving.  So this rig sits while I find a new place to hang antennas.  Eventually, the TX will get a RX mate when it is possible to box up a 40m DC RX with Si5751 and OLED display. Am still trying to solve how to mount an OLED display cleanly in an aluminum box. First, I have to reconstruct my workbench.


Keep up your good work, and that is no April Fool’s joke. 


73,


Chuck KE5HPY


Monday, April 29, 2024

Old Tricks, Lore, and Art -- Freezing and Baking our LC VFOs -- An Example from Cuba


Pavel CO7WT explained why Cuban hams used a process of thermal endurance to improved the frequency stability of their homebrew rigs: 

  --------------------

I'm CO7WT from Cuba, I started my endeavor in ham radio with a islander board.

They (FRC, like ARRL but in Cuba) made a print of a PCB to build the Islander, with component numbers and values, making construction fool proof, I think it was on the 90 or end of the 80...

Mine was built with scraps from an old KRIM 218 Russian B&W TV as Coro's explain, later on I get the 6bz6 and 6be6 tubes for the receiver (this worked better than the Russian parts) the VFO was transistorized, made with Russian components. A friend CO7CO Amaury, explain me a trick: thermal endurance:

For a week put a crust of ice on the VFO board by placing it in a frosty fridge during the night. Put them in the sun by day. This indeed improved stability, this was an old trick.

By thermal endurance I mean improving thermal resistance vs tolerance, meaning that tolerance doesn't vary as much with temperature changes.

 It's crazy, but it worked!!

I remember that my vfo was on 7 MHz, with Russian kt315 as normal Russian transistors and capacitors, nothing 1-5%, 20% at most, it ran several khz in 5-10 min, mounted on a Russian "Formica" board (no PCB) and wired underneath.

After that treatment to the complete board with components and everything, including the variable capacitor; I managed to get it to "only" noticeably in the ear after 30-40 minutes.

To me it was magic!!

Basically, what I'm describing is just "thermal annealing", but Cuban-style and with more extreme limits.

In a refrigerator you could easily reach -10 c and in the sun for a day in Cuba 60-80 celsius at least.

In Cuba in the 1990s-2010s many designs of DSB radios proliferated, both direct conversion and super heterodine (using an intermediate frequency)

At first tubes and then transistors, mostly using salvaged parts, so it was common to find 465/500 kHz (if common Russian) 455 khz and 10.7 Mhz with or without "wide" filters since narrow filters for SSBs were not scarce: they were almost impossible to get.

Not only that, crystals, ifs, PCBs, transistors, etc.

Then, around the 2000s, Russian 500 khz USB filters began to appear (from Polosa, Karat, etc. equipment from companies that deregistered and switched to amateur radio) and that contributed to improving... Even though at 7 MHz 500kc if is very close.

I made many modifications with the years mostly from 1998 to 2004 ish... better filters in front of the first RX stage (same IF described between stages) improved selectivity and out of band rejection, remember we had on that days broadcast as low as 7100 khz

Tx part was a pair of russian 6P7 (eq. RCA 807) in paralell, etc.

The Jagüey and others is one of those evolutions...

 This is something I remember...

73 CO7WT

----------------

This is not as crazy as it sounds.  We can find versions of the same technique in the writings of Roy Lewellan W7EL, Doug DeMaw W1FB, and Wes Hayward W7ZOI.  I found this 2007 message from our friend Farhan VU2ESE: 

I think the word 'annealing' is a bit of a misnomer. the idea is to thermally expand and contract the wiring a few times to relieve any mechanical stresses in the coil. after an extreme swing of tempuratures, the winding will be more settled.
this techniques owes itself to w7EL. I first read about it in his article on the 'Optimized transceiver' pulished in 1992 or so.
but all said and done, it is part of the lore. it needs a rigorous proof.
- farhan

https://groups.io/g/BITX20/topic/copper_wire_annealing/4101565?p=,,,20,0,0,0::recentpostdate/sticky,,,20,1,860,4101565,previd%3D1193595376000000000,nextid%3D1194269624000000000&previd=1193595376000000000&nextid=1194269624000000000


And here is another example of coil boiling: 

https://www.qsl.net/kd7rem/vfo.htm

-----------

I can almost hear it,  all the way from across the continent:  Pete N6QW should, please, stop chuckling.  Obviously these stabilization techniques are not necessary with his beloved Si5351.  Some will see all this as evidence of the barbarity and backwardness of LC VFOs.  But I see it as another example of lore, of art in the science of radio. (Even the FCC regs talk about "Advancing the radio art." ) This is sort of like the rules we follow for LC VFO stability:  keep the frequency low, use NP0 or silver mica caps, use air core inductors, keep lead length short, and pay attention to mechanical stability.  Sure, you don't have to do any of this with an Si5351.  Then again, you don't have to do any of this to achieve stability in an Iphone. But there is NO SOUL in an Iphone, nor in an Si5351.  Give me a Harley, a Colpitts, or a Pierce any day.  But as I try to remember, this is a hobby.  Some people like digital VFOs.  "To each, his own." 


Thanks Pavel. 


Sunday, April 28, 2024

A Soviet Tube in Cuba: The "Little Spider"


I hope readers have picked up on the discussion of the Islander DSB rig out of Cuba. We had a bit of a breakthrough on this recently. I've been writing about it on the blog: 

https://soldersmoke.blogspot.com/2024/04/re-building-islander-dsbcw-rig-in-cuba.html 

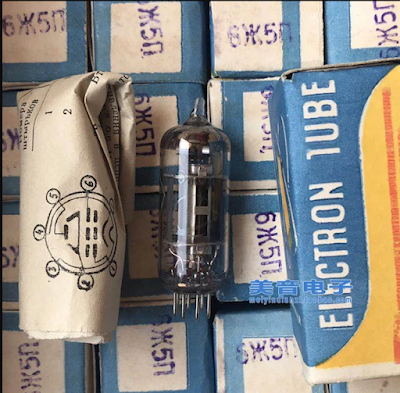
One thing I think is especially interesting:  The Cubans were using parts taken out of old Soviet TV sets.  One of the tubes used in the VFO section of the Islander was known among the Cuban hams as "the little spider." 

Arnie Coro CO2KK explains why: 

"VFO is made with ONE of the 6 "little spider" 5 pentodes... By the way, I am sure you will like to know why the tube is locally known like that... the ZHE letter of the Cyrillic alphabet is something difficult to pronounce to a Cuban - or any other non slavic for the matter - and it resembles like a little spider on the tube's carton and... that's why it is not a 6 "ZHE" 5 but a 6 "little spider" five!!!"

Saturday, April 27, 2024

Cloud Chamber Finale


Today's aparatus (above).  Chamber is larger and I left the bottom sealed.  It sits directly atop a chunk of dry ice.  The spongeat the top is soaked in alcohol. 


This is a one minute clip.  It does seem a bit like watching paint dry, but you will see many atomic particles moving through the cloud. If you look to the right side of the screen you will see that the cloud has started to rain alcohol.  I will put additional clips on the Patreon site. 


Harry Cliff's wonderful book mentions the origins of the cloud chamber. 

Click for a better view. 

Click for a better view/

Here's an interesing site on cloud chambers: 


And here's another one: 


I think that is all I will do on the cloud chambers.  This was a lot of fun, but I am running out of dry ice.  There is, however, a lot of room for improvement and experimentation here, and a project likes this puts you in touch with the earliest days of particle physics (as Harry Cliff explains above). Good luck on 1.22 nanometers! Please let us know how you do. 

Here is one more look at the "output" of my cloud chamber.  This is a ten minute video.   You can see many traces in this. Check it out: 


Thank you Charles Wilson.  And thank you C.L. Stong. 

Friday, April 26, 2024

Re-building the Islander DSB/CW Tube Rig in Cuba

The VFO Board

The "motherboard" for an Islander
Islander boards recently obtained in Cuba by CO7WT

Pavel CO7WT is making great progress in re-building an Islander DSB rig, the same kind of rig that got him started in ham radio, and that was so popular in Cuba years ago.  Here are some background blog posts on this rig:  https://soldersmoke.blogspot.com/search?q=Islander  In essence, the Islander was the earlier tube DSB/CW rig; the Jaguey was a later, solid-state DSB/CW rig. 

When they get this Islander going, hams outside Cuba should definitely try to work this re-creation of an important rig. 

Thanks Pavel for all the information.  I will share with the group info that Pavel sent about temperature stabilization techniques used on this rig.  

Pavel CO7WT writes: 

Great news, today I received the package from my colleague in zone 6.

Two original islander motherboards and one from the vfo!

I'm doing a search among old technical friends in the city and in the country to see if I can put together at least a transceiver motherboard.

Audio triode-pentode is easy, as is tx pentode and audio double triode.

The difficult ones would be the 6cb6 and 6bz6 of the receiver... At least according to what I have polled among my local friends...

Tomorrow some friends are going to start looking for bases and valves that can be used to build a trx islander.

All out of pure nostalgia. I intend to make it qrp, that is, up to the output pentode, which there is between 3-5W of power, that is enough for me.

I am looking for alternatives for small sources, perhaps I will use switching for the filaments and we will see what I can get for the 180-250v of the plates.


Earlier: 

CO7WT here, built a pair of the Islander back in the time, the most scary part was the power supply.

The 600V is 300ish V from the transformed DOUBLED stright from the transformer and if you look closely on the diagram the doubling capacitor need to be of good quality otherwise it will explode in the spot.

As you can imagine, using scrapped parts means that very often this capacitor explodes, even after a few months of duty, that was a common problem.

We used to use 47uF/800v from Germany that was almost easy to obtain, but exploded like fireworks a given day.

Later I learned that if you put a resistor of about 1k 5W in series and work it for a while like this [no real voltage at the end] it will behave in the future and this trick saved many, a trick that was shared with Coro CO2KK and he found the explanation on the taming/training of the dielectric after storage/inactivity will prevent it from exploding.

I think he made mention this on a DXers Unlimited program...


Wednesday, April 24, 2024

Big Success with Cloud Chamber

 
My Cloud Chamber

It was time to take a break from building SSB transceivers.  I wanted to build something completely different.  I went with something that I've wanted to build since I was a kid. Sometime in the late 1960s, I read about a Wilson Cloud Chamber in the book "The Amateur Scientist" by C.L. Stong  (my mom got the book for me, at great sacrifice).  

You have to make a little cloud in a chamber.  When an atomic particle flies through (as they do!) it will leave a little trace in the cloud.  Cool.  Literally cool: This is a dry ice diffusion cloud chamber.  You make the cloud by putting isopropyl alcohol in blotter paper at the top of the chamber. You then cool the bottom part (a lot) using dry ice. The alcohol evaporates, then is cooled into a cloud by the low temperature of the dry ice. Fortunately, my local supermarket has started selling dry ice (it was harder to come by when I was a kid).  For the chamber, I used a plastic container from the same superpmarket. For the light source I used a little LED workshop flasllight.  

I saw traces immediately, while I was setting the thing up.   

Here are two videos of what I saw during that first hour:  

This one minute video shows the traces I saw.  Look for the little whisps of "smoke": 

This one shows a few more traces, but then BOOM at about 27 seconds.  Check it out.  What is that?  (Thinking about it some more, I think this may have just been some higher humidity air leaking into the chamber and condensing suddenly.) 

Here's the C.L Stong book.  My project begins on page 307

http://www.ke5fx.com/stong.pdf

So what band would this be?  Something in the nanometer range, right? 

Here is a video showing what you see in a large cloud chamber: 

https://www.exploratorium.edu/video/cloud-chamber


Tuesday, April 23, 2024

EXCELLENT Video Series on RF Amplifier Design


Run, don't walk, to this video series by RF MAN.   He is truly, THE MAN!  Pete N6QW found this series, passed it to Dean KK4DAS, who alerted me.  Thanks guys. 

This is a six part video series on how to design an HF 50 watt RF linear amplifier using our beloved IRF-510 MOSFET.  Each video is about 30 minutes long. 

The author (who is this genius?) makes great use of LTSpice.  I have been using this software for years, but still I learned a lot by watching these videos:  AC Analysis.  How to change the values of the things you are measuring.  Even something as simple as drawing a wire right through a component to get leads on both sides.  This is really useful stuff. 

RF Man goes through the whole design of the RF amplifier.  He describes how to use LTSpice to determine input and output impedances (he does this with a NanoVNA in another video).  He talks about the use of negative feedback, and temperature compensation.  There are swamping resistors as Q killers.  This is all great, real-world stuff.  

Especially useful for me was his presentation on how to do "two tone" IMD tests.
  
There is a lot to learn here.  RF Man has a really wonderful way of explaining complex theory, and demonstrating complex tests.   This series makes me want to build a MOSFET amplifier.  

Look for the six parts of this series.  Here is RF Man's YouTube channel: 


Thank you, RF Man! 

Sunday, April 21, 2024

The War of the Worlds -- In CW -- By Chuck Adams AA7FO


This is for CW fans, or for those wishing to improve their CW skills.  You can now listen to the entire H.G. Wells book in CW, thanks to Chuck Adams, AA7FO. 

This seems very timely becasue my son and I are watching the NETFLIX version of "The Three Body Problem" by Cixin Liu.   This deals with an entirely different war of the worlds.  

Check out Chuck's CW version of the book.  Thanks Chuck! 

https://www.aa7fo.com/war-of-the-worlds.html

Friday, April 19, 2024

Deep Space Station 43 -- Canberra, Australia


https://spectrum.ieee.org/apollo-era-antenna-voyager-2

From the IEEE article: 

The dish’s manufacturer took great pains to ensure that its surface had no bumps or rough spots. The smoother the dish surface, the better it is at focusing incident waves onto the signal detector so there’s a higher signal-to-noise ratio.

DSS-43 boasts a pointing accuracy of 0.005 degrees (18 arc seconds)—which is important for ensuring that it is pointed directly at the receiver on a distant spacecraft. Voyager 2 broadcasts using a 23-watt radio. But by the time the signals traverse the multibillion-kilometer distance from the heliopause to Earth, their power has faded to a level 20 billion times weaker than what is needed to run a digital watch. Capturing every bit of the incident signals is crucial to gathering useful information from the transmissions.

The antenna has a transmitter capable of 400 kilowatts, with a beam width of 0.0038 degrees. Without the 1987 upgrade, signals sent from DSS-43 to a spacecraft venturing outside the solar system likely never would reach their target.


Tuesday, April 16, 2024

The Rad Receiver from N6GWB

Geoff N6GWB and his eldest have produced a really wonderful receiver, and have joined the elite ranks of those who have built their own receivers.   Congratulations to both!  ( Be sure to watch the video below.)

Geoff writes:

Though I built it, my eldest has retained naming rights.  Behold the Rad Radio Receiver, an Soldersmoke inspired build.  It’s a 40m DC reciever.  I had planned on making this a truly 50-50 N6QW N2CQR build, but I needed to get it done for a show and tell this Wednesday.  I have N6QW dual JFET RF amp and mixer modules.  I have the N2CQR ceramic ocillator circuit from the 2017 DC receiver project.  I had planned on including the all analog audio amp from the more recent N2CQR DC project, but alas, time got the best of me.  I was hoping to make the whole thing all-analog.  (I thought the all analog would get me more “hard work” kudos at the show and tell.) I ended up including a LM386 audio amp making this a bit of a cyborg.


I have included pictures of the receiver open and closed.  The closed pic includes bespoke decals.  I have also include a brief movie demonstrating the audio.

Many, many thanks for the inspiration and knowledge!

Geoff
N6GWB


Designer: Douglas Bowman | Dimodifikasi oleh Abdul Munir Original Posting Rounders 3 Column