Podcasting since 2005! Listen to Latest SolderSmoke

Sunday, May 20, 2018

F5LVG's Nail Board Receiver -- Names for the Technique


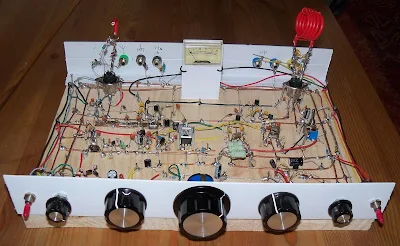
Pete WB9FLW reminds us that Olivier F5LVG has LONG been using copper nails and wood boards to build amazing rigs.  See above for one magnificent example.  That, my friends, is a superhet receiver.  Inspirational! 


A few posts back we asked for nominations for the official name of this technique.   We still have to consult with Steve Silverman on this, but the nominations are: 

Armand WA1UQO (perhaps reflecting his proximity to Washingotn DC)  "Wire-Tapping" 

Gary Hinson:  "Coffin Dodging"  (sounds a bit dodgy to me). 

And the front runner so far, from Melbourne, Australia -- drum roll please: 

Peter Parker:  "NAILBOARDING."  (Peter thinks he nailed it with that one.  I tend to agree.)  

Wednesday, May 16, 2018

Youngest Homebrew Hero: 17 year-old Sam Zeelof Makes His Own Integrated Circuits


Seventeen year-old Sam Zeelof, KD2ENL, is making his own integrated circuits in his garage. 

Wow.  This makes me think about another seventeen year-old -- the fellow who appears on pages 63-64 of Cliff DeSoto's "200 Meters and Down." (I have the story on page 81 of "SolderSmoke -- Global Adventures in Wireless Electronics.")   In the early days of radio that kid amazed us by making his own vacuum tubes.  Sam Zeelof is clearly following in that tradition. 

No "mysterious black boxes" for Sam!  No "appliance chips" for him!  FB OM.  

This is really amazing.  Here are the links: 

https://spectrum.ieee.org/semiconductors/devices/the-high-school-student-whos-building-his-own-integrated-circuits


One of Sam's chips
Thanks to Bruce KC1FSZ for alerting us to this amazing work. 

Sunday, May 13, 2018

A Construction Technique that REALLY "Nails it" -- But what do we call it?


Thanks to Rogier PA1ZZ (long in W6) for this.  I guess I have used a variation of this technique in some antenna tuner projects, and maybe in a crystal radio effort.   This also reminded both Pete and me of the electronic project kits that we were given as kids.  Those kits had little springs that were supposed to keep the components in contact.  They might have worked better with nails.  

This technique definitely provides an opportunity for an earnest young guy to make use of his soldering GUN.  I don't think a wimpy 35 watt iron would be up to the task.  


What should we call this technique?  We have "ugly" and "Manhattan" and
"Muppet Boards."   What do we call this? 


Saturday, May 12, 2018

NN2K's Beautiful Pine-Board Al-Fresco Thermatron AM Transmitter


On Saturday mornings (around dawn) I often listen to the Old Military Radio Net on 3885 kHz.  I find it inspirational.  This morning the inspiration was provided by Rick NN2K.  His signal from Binghamton New York was makeing the trip to Northern Virginia.  When I heard him mention that he was using a "Pine Board Transmitter" I felt the urge to look for a picture.  QRZ.com provided the photo.  

Rich says he built this rig in January 2018 based on a QST article by Bob Heil.   FB Rich! 
And thanks to Ted W3PWW for running the Old Military Radio Net for so many years. 


Tuesday, May 8, 2018

KE4MIQ's Repurposed Raduino Receiver


FB James -- Really glad you are listening,  and that you are having fun with a Direct Conversion receiver --- souped up with a Raduino! 


Bill, Pete

Just listened to #204. (New Listener)
You talked about using the Raduino with other radios.
I bought one of Mike Hagen's RaduinoXs to use with my Bitx40. So, I have repurposed my original Raduino as a VFO for my 4SQRP ZZRX-40 DC receiver. I used Allards's v1.26 with a few code changes to tune 7.000 to 7.300. It's currently al fresco on a piece of Hobby Lobby foam board. I may "cabinetize" at some future date.
Attached is a pic of the ZZRX-40, Raduino, and Goodwill Sony speaker with Jameco stereo amp, all running off of Harbor Freight 9v Nimh rechargables.

So far I have heard over 40 states and 20 countries with a 65ft piece of wire in the rafters.
73s
James
KE4MIQ

Saturday, May 5, 2018

SolderSmoke Podcast #204 April 1, SPRAT Cover 2, uBITX mania, MAILBAG


SolderSmoke Podcast #204 is available! 

http://soldersmoke.com/soldersmoke204.mp3

5 May 2018

April 1 Recap -- We thank you for your support! 

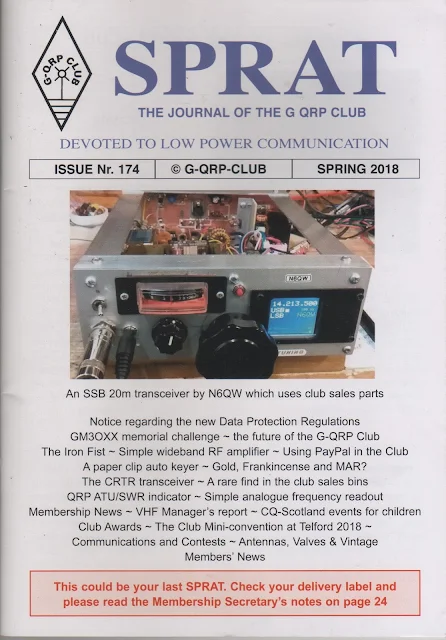
Pete's Rig on Cover of SPRAT 174 

uBITX Mania

uBITX Dual Conversion Design

uBITX Gettng more out of the Arduino/Si5351 combo

uBITX KD8CEC's amazing software

uBITX Future Possibilities

uBITX On-the-Air Experiences, with CW too! 

MAILBAG

KD8CGH's Hyderabox -- THERE ARE TWO! 
QSO with N1AW's cardboard uBITX
DuWayne on QSO TODAY
Jack 5R8SV -- Radio Gods NOT Happy
Jack Purdum W8TEE -- Thanks OM
Charles AI4OT
Chris KB4PBT 15 inch telescope
John WJ0NF Reading SolderSmoke
Ken W8KTP Ordering a uBITX 
Darren KG7KOI  Listening
Gary AK4NA  New Word:  "Cabinetize" FB OM! 


Sunday, April 29, 2018

"The Thrill That'll Hit Ya..." AGAIN! Three cheers for Pete, SPRAT, and GQRP


On the cover of issue 173 of our beloved SPRAT magazine they had my little Direct Conversion receiver.  We joked on the podcast about the old song by Doctor Hook about getting on the "Cover of the Rolling Stone."  Well, on the cover of issue 174 they have one of Pete's magnificent creations.  

Thanks again to the guys who put so much work into SPRAT magazine.  They are now looking for some help.  Please subscribe, and check out page 4 of issue 174 for details on the help that GQRP is looking for.  


Sunday, April 22, 2018

KC1FSZ's Above Board, Al Fresco, Free Range, QRO, 4-Foot-Long, Wood-Based BITX


DON'T BOX IT UP BRUCE!  LET THAT RIG LIVE FREE AND BREATHE!  

COULD THIS BE THE WORLD'S BIGGEST BITX?

Hi Guys:

First off, congrats on back-to-back SPRAT covers.  

I’ve succeeded in my QRO quest.  Now I’m running the finals from 28V using a home-brew linear power supply and getting about 20W out.  LM723 + 2N3055’s.  I’m making a lot more contacts too.  The only problem is that the “Peppermint Line” is close to 4 feet long now! (Photo below).  I don’t know how N6QW gets his rigs packed into such small cases.  Putting the various boards in edge-wise will probably help a lot, so that’s going to be my approach to the final packaging job.

73s, 

Bruce KC1FSZ


Saturday, April 21, 2018

Hyderabox! uBITX in a Lunch Box


Oh man, I'm sorry I missed this one.  John sent it to me in January, but it got lost amidst all the uBITX messages.  

I like it!  It shows that I am not the only one guilty of re-purposing Benton Harbor Lunch Boxes.  

But what should we call it?  It is now more Hyderabad than Benton Harbor.  How about Hyderabox?  That's it!   

Bill
  You mentioned in your last podcast recycling "Benton Harbor Lunch Boxs". Many decades ago I talked my Junior High shop teacher into letting me build a Twoer instead of his lame project. Over the years  2 meter AM and the Twoer faded away. 
I recently revived a Lunchbox case for my uBitx. I added a Sotabeams CW filter that is controlled by the old T/R knob. Down the filter is bypassed, up one is wide CW and up two is narrow CW. The green pilot light light is a CW tuning indicator. 
I use KD8CEC's code which cleans up many small problems and adds a memory keyer and CAT control to the uBitx.
I modded KD8CEC's code to remove the paddle sense segment so that it only works with a straight key. This makes the keying much cleaner. 
First contact with the modded uBitx was this morning. With 5 watts out I got a 599 from K3Y/7 (K7QBW) in Oregon back to me in Ohio.
    Bob    KD8CGH

Tuesday, April 17, 2018

N1AW's uBITX -- Cardboard Panels, and the Mic in a Sharpie


On Sunday night at 7 pm local on 7.277 MHz BITX users gather.   This week was the debut of my uBITX.  I was able to make only one contact before we were over-run by the Rookie Roundup, but that contact was a good one.  Above you can see N1AW's FB uBITX.   The front and back panels are made of cardboard.  The mic holder is from a re-purposed Sharpie marker.  FB Al.  Thanks for the contact.  

Sunday, April 15, 2018

Carpentry and Socketry for the uBITX


Yesterday I decided to spend some time at the bench -- I wanted to get the uBITX boxed up.  My basswood box had arrived from Amazon on Friday.  It was time for what George Dobbs G3RJV called "socketry."  

First, the back.  I figured I would need five connectors back there.   Connectors for 12V DC, speaker, and antenna would be needed right away (it is my preference to have the speaker connector on the back of the BITX).  Looking ahead, I might want to also have a jack for T/R control of my linear amplifier, and a jack for 24 VDC if I want to go wild and put more voltage on the drains of the IRF510s. So I put two extra holes in there.  


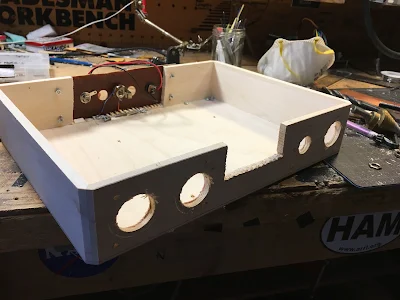
Basswood is SO easy to cut.  I put the LCD in the center of the front panel, and opted to put the board close to the front of the board.  This avoids the need for jumpers to connect the Raduino to the LCD, and it keeps the lines to the front panel controls and connectors very short. I mounted the board on the spacers that came with the BITX, drilling holes the bottom of the basswood box.  It all fit quite nicely. 


I would need to put two jacks on the front panels:  key jack and mic jack.  And I'd need two controls: main tuning and AF gain.  I used hole saws to cut holes big enough to accommodate the four items. 


The controls and jacks were then placed on two small pieces of copper clad board.  These then went on the front panel.  

Wiring up the uBITX was  easy.  I just followed Farhan's instructions.  I did the wiring AFTER placing the boards and controls in the box -- this helped me keep all the wires at their optimum length (not too long, and more important -- not too short!).  If you do it this way, put a cloth over the boards so you don't drop solder blobs on the uBITX. 

Farhan's uBITX fired up nicely as soon as I applied power.   The receiver really sounds nice.  I hope to make some contacts with it today. 

Three cheers for Farhan! 

Saturday, April 14, 2018

Boxing up my uBITX -- Question for the Group


Our friend Rogier and I are involved in an East Coast -- West Coast uBITX launch project -- we plan to assemble our uBITXs together (more or less, via Skype) and then get them on the air. 

As has been my recent practice, I have opted to put my uBITX in the same kind of wooden box that I used for my three scratch-built BITX projects.  See above. 

Now, due to Farhan's wizardry the uBITX is considerably smaller than the box.  This is, of course, a good thing. It leaves room in the box for many bells and whistles.  

But here is my first box design question

Should I put the uBITX board to the front of the box so that the LCD can be connected to the board DIRECTLY via the connector on the Raduino board (no jumpers needed), or should I put the uBITX board to the back of the box so that I can stick the PA heat sinks out the back?   In the later case I'd have to use 4 inch jumper cables to connect the LCD to the Raduino.  This use of jumpers seems to increase the possibility of noise from the display. 

What say the Knack Wizards?  Back of the box with LCD jumpers, or front of the box with no jumpers but heat sinks inside the box? 
Designer: Douglas Bowman | Dimodifikasi oleh Abdul Munir Original Posting Rounders 3 Column