Podcasting since 2005! Listen to Latest SolderSmoke

Thursday, November 13, 2014

Colin's BITX


With advice and tribal knowledge from N6QW and MeSquares from W1REX, Colin M1BUU, is making excellent progress on his BITX.  I see that he has some territory on the board reserved for a DDS VFO.  That's fine, but here's and idea for Colin and other builders:  Why not build it with the standard VFO first and then add the DDS or Si570 VFO later, perhaps as an external accessory?   That way you get the experience of building an LC VFO -- the full BITX experience. 

Yea, it is hard to imagine Paul M0XPD as a newcomer to the hobby such a short time ago -- he is definitely now in the ranks of the esteemed digital Elmers.   

And yes Colin, we do hope you avoid unwanted oscillations.  Because of Farhan's great design you have a good shot at avoiding this plague.  But be prepared OM.  It happens to the best of us.  A lot.   Stiff upper lip!  Never give in!  

*************

Hi Bill,
I enjoyed your video about your Arduino experiment. You bet me to it! I'm really looking forward to getting my version of an Arduino powered BITX up and running.
Steady progress is being made, yesterday I added my first bidirectional amplifier to the build. I now have the mic amp, BFO, balanced modulator and first amp completed. I tested the BFO on it's own and got a respectable looking signal out of it and with a good swing below 10MHz.
Next I need to add the crystal filter, second IF amp and mixer. Pete's video will help for the mixer! BTW, I'm using the ver3 schematic but I intend to use the ver1 band pass filter.
I set out building the circuit following the N2CQR layout diagram but I've already run short on space! I do have a good excuse though, my board is smaller than yours (10"x6").
Despite my best intentions, I'm falling back towards old habits of making my circuits physically small. I'm using MeSquares in order to try and force myself to space things out a bit. I do hope that I don't end up with any unwanted coupling!
I must try hard to leave lots of space between the next bits of circuit.
I was listening to SolderSmoke 104 today and Paul M0XPD was introduced as a new ham. Little did we know that Paul would become such a big player!
73, Colin M1BUU

Our book: "SolderSmoke -- Global Adventures in Wireless Electronics" http://soldersmoke.com/book.htm Our coffee mugs, T-Shirts, bumper stickers: http://www.cafepress.com/SolderSmoke Our Book Store: http://astore.amazon.com/contracross-20
Wednesday, November 12, 2014

Tricycle Mobile Contact


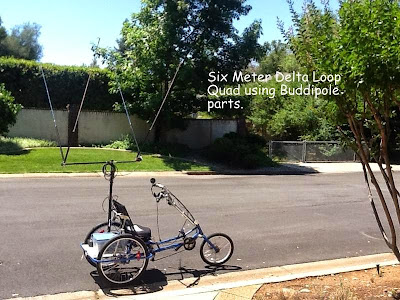
I couldn't resist posting this picture of the vehicle used by Budd, W3FF.   I talked to him yesterday on 17 meters -- transcontinental -- as he pedaled home in California on his magnificent trike.  He wasn't using the quad in the picture (he was on a vertical). The  six meter quad is fantastic.  He worked Japan with this rig on six. He has a trike trailer that carries his linear amplifier. 

More on Budd and his trike mobile operations here: 
https://sites.google.com/site/w3ffhomepage/

Our book: "SolderSmoke -- Global Adventures in Wireless Electronics" http://soldersmoke.com/book.htm Our coffee mugs, T-Shirts, bumper stickers: http://www.cafepress.com/SolderSmoke Our Book Store: http://astore.amazon.com/contracross-20

DDS amplifier


Tony, G4WIF, asked about an amplifier to boost the output of the AD9850 chip.  Here is Dr. Juliano's prescription: 

You might find that once you plug that DDS into a circuit you may not quite get 1 V pk to pk  and in fact after about 10 MHz it really starts to sag. See the attached drawing as you can put this “afterburner’ on the output of the DDS. The isolated output is good if you are interfacing with “toob” type equipment –it can be left off if you are doing SS or just left in place. This is the output from the amp and as you can see fairly clean.
 
73’s
Pete N6QW
 
IMG_0266
 

Our book: "SolderSmoke -- Global Adventures in Wireless Electronics" http://soldersmoke.com/book.htm Our coffee mugs, T-Shirts, bumper stickers: http://www.cafepress.com/SolderSmoke Our Book Store: http://astore.amazon.com/contracross-20

Tuesday, November 11, 2014

Digitizing my BITX17 with an Arduino and an AD9850 chip


This is only temporary!  My analog, discrete, hardware-defined BITX17 was NOT harmed or even modified for this little experiment. 

Our book: "SolderSmoke -- Global Adventures in Wireless Electronics" http://soldersmoke.com/book.htm Our coffee mugs, T-Shirts, bumper stickers: http://www.cafepress.com/SolderSmoke Our Book Store: http://astore.amazon.com/contracross-20

Monday, November 10, 2014

Background on the use of Si5351 -- code and integration with Arduino Nano (video)


I somehow missed this one.  Here Pete talks about how the use of the Si5351 in ham radio has been evolving, who has been working on it, etc.  

Our book: "SolderSmoke -- Global Adventures in Wireless Electronics" http://soldersmoke.com/book.htm Our coffee mugs, T-Shirts, bumper stickers: http://www.cafepress.com/SolderSmoke Our Book Store: http://astore.amazon.com/contracross-20
Sunday, November 9, 2014

Pete Goes Superhet with the Si5351 generating BOTH VFO and BFO (video)


Congrats to Pete for his amazingly fast development of a 40 meter superhet receiver using a single Adafruit Si5351 paired with an Arduino Nano for ALL of the frequency generation.   No more VFOs, no more crystals.  It sounds great!   Amazing stuff.  

Our book: "SolderSmoke -- Global Adventures in Wireless Electronics" http://soldersmoke.com/book.htm Our coffee mugs, T-Shirts, bumper stickers: http://www.cafepress.com/SolderSmoke Our Book Store: http://astore.amazon.com/contracross-20

BIG Amplifiers with SMALL Microcontrollers and LOTS of Tribal Knowledge


Hi Bill,
I wanted to forward to you a slightly edited email I sent to one of our podcast listener’s as I think this is a really good example of some “Tribal Knowledge”.
-----------------------------------------------------------------------------------------------------------------------------------------------------------------------------------------------------------------------------
Hi OM,

Ham radio publications are much like the Internet –all that is published must be scrutinized. One such publication had a beautiful QRP to QRO amp using a 3CX800A7. A few watts in and 800 Watts out. My daughter was in FM radio broadcasting and I told her to introduce herself to the station engineer and to look out for any pulls – then the floodgates opened –about a week later I had a 3CX800A7.
So I started to work on the amp. The circuits just didn’t make sense and parts were missing that would make it work correctly. I contacted the author and here is what he shared. He built the amp but never did get to proof the final article. In fact he sent me his notes and sketches which were correct. Thus I could have never built that amp using just the article. I built it for one band, 20 Meters. It has a tuned input and a Pi-L output so is quite excellent on harmonic reduction.
Oh BTW this amp caused me to learn about PIC Microcontrollers. You cannot hit the 3CX800A7 with HV voltage until the cathode is warmed up (must be a female tube). That time delay is 3 minutes. I could not find a suitable time delay relay with a 3 minute delay that didn’t cost an arm and a leg. So that is when I thought about using the PIC16F84 as a time delay relay. Later I ported that over to a 12F675. The cost was less than $10. In the 3CX1500A7 amp ( another free tube)  I have two microcontrollers in there. One is used for a three second step start on the filaments (don’t want to shock the filaments with inrush current) and the second for the 3 minute delay before starting the HV step start sequence.
You can see the “Big AMP” on my website at http://www.jessystems.com.
There was only one problem – I was worried about the cooling of the tube so I made sure there was plenty of air which I dump into a very small sub-chassis and the exhaust is out through the tube. Well “Dah” large volume in and small port for exhaust and you have a jet engine sitting on the desk top. Man it was loud – I would wear headphones when it was working.  When I built the 3CX1500A7 amp I used a larger plenum so not as loud.
There are several key points I want to make about tribal knowledge:
  1. Turn off the soldering iron and spend a good deal of time “noodling” over the circuit so that it is clear what each function will do and that all the wires connect to something.
  2. Contact the author and ask lots of questions and you might be surprised to find out the published design is not what was designed!
  3. Look for uncommon solutions to build problems. Many times parts used in the articles are so unique that only one exists in the whole world and it is installed in the authors unit.
  4. The amp was built in 2000 and the use of the PIC16F84 as a time delay for an amp was a bit leading edge but don’t be afraid to employ some advanced technology into your projects. [Today an Arduino built into the amp could do time delay, temperature control of blowers, SWR sensing, grid trip protection and even warm your coffee.]
  5. In the Big AMP I figured out how to keep the blower going for about 1 minute after the amp is turned off to “cool down” the tube. The point here is to think about not just the amp itself but refinements to make that $600 tube last for a very long time thus filament current inrush protection and tube cool down.
  6. Don’t forget SAFETY – there is 2000 Volts @ 1 amp running around chassis–it is an electric chair sitting on your desk top. I included a microswitch that when the top cover is off it de-energizes the HV circuits. See if you can spot it in the photos.
73’s
Pete N6QW
PS The amp really does exist –see below.


Our book: "SolderSmoke -- Global Adventures in Wireless Electronics" http://soldersmoke.com/book.htm Our coffee mugs, T-Shirts, bumper stickers: http://www.cafepress.com/SolderSmoke Our Book Store: http://astore.amazon.com/contracross-20
Designer: Douglas Bowman | Dimodifikasi oleh Abdul Munir Original Posting Rounders 3 Column