Podcasting since 2005! Listen to Latest SolderSmoke

Showing posts with label workbench. Show all posts

Monday, June 7, 2021

Dino's Test Gear -- KL0S at FDIM 2021


Great test gear advice from Dino KL0S.  Thanks to Dino and to QRPARCI!  


Wednesday, May 12, 2021

The Joy of Fixing Broken Things (a really amazing video)


This amazing 10 minute video captures very well the joy of fixing broken things. It comes to us through a recommendation from Paul VK3HN in Melbourne, Australia. Thanks Paul.

I hope we will see more from Van Neistat.  He already has a bunch of videos on his YouTube channel:   https://www.youtube.com/channel/UC5mPJA4y5G8Z6aNkY6AxgAw

I often tell the story of the OT (probably now an SK) who at hamfests would ask if a piece of old gear was working. If the vendor answered honestly and said no, OT would reply, "Good, I pay extra for that."  He too liked to fix things.

Wednesday, April 7, 2021

"The Perfect Trap for the Engineering Mind" -- Leo Fernekes' Stirling Engine


I did a post about Leo back in August: 

Although it is not about radio, homebrewers will find much to resonate with in Leo's Stirling engine project.  

Warning:  There is a Part II.  And there may be more.  Proceed at your own risk. 

Sunday, April 4, 2021

A Satellite Ground Station (Receiver) Made from Junk


Very cool.  This guy (who brew up on an island in Alaska) really knows how to use aluminum tape and the junk that fills most workshops. I like his use of the security camera mount as an az-el antenna rotator. 

I foolishly discarded a Direct TV dish.  I could have been receiving GOES images by now! 

Just last week I got the same RTL-SDR.com V3 dongle that he is using.  Very FB.   It does HF direct sampling with no hardware mods and no upconverter. 

More from the builder, Gabe Emerson (KL1FI): 


Wednesday, February 17, 2021

Put this Chart on the Wall Above Your Workbench


If you are like me and sometimes forget if R=E^2/P or E^2P, this chart will help. Very useful.  

Friday, February 12, 2021

A Lifetime of Workshops


https://microship.com/consoles/?fbclid=IwAR37yc-NfOrUC93C8QZYXZfakGLf-4eBtPw2php0CpzGHBW3-fb55ciyp0w

It has been more than decade, but we've posted about Steven K. Roberts N4RVE before: 

https://soldersmoke.blogspot.com/2009/09/i-didnt-care-i-had-secret-life.html

https://soldersmoke.blogspot.com/2009/09/knack-on-bike-steve-roberts-video.html

This morning I came across his recent article about the workshops he's had over the course of his life.  Very nice.  Man, I should have held on to that SP-600 I once had.  You folks will like this: 

https://microship.com/consoles/?fbclid=IwAR37yc-NfOrUC93C8QZYXZfakGLf-4eBtPw2php0CpzGHBW3-fb55ciyp0w

Wednesday, February 10, 2021

Microphone Men -- A Really Nice Video


Thanks to Rogier PA1ZZ for sending me this really nice video.  

Thursday, November 5, 2020

Peter Sripol's Electric Ultralight (and his workshop)


It has been a while since we looked in on Peter Sripol.  Thanks to Hack-A-Day we got to see this really nice video on his latest project -- an electric-powered ultralight.

I thought the foam wings held together by Gorilla glue were cool.  The electric motor was very nice.  But I guess the thing I liked the most about this video was the window it gave us into Peter's workshop.  That is obviously a REAL workshop where things are really built.   I like the white board -- I need one of those. The heat gun also seems very useful. 

Three cheers for Peter's very supportive dad.  it must be tough for him to watch his son take off in those foam contraptions, sometimes with water bottles taped to the tail!    

Saturday, September 19, 2020

SolderSmoke Podcast #225: Mars, uSDX, G-QRP, HP8640B, DX-390, Rotary Tools, Walla Walla SDR, MAILBAG

SolderSmoke Podcast #225 is available

http://soldersmoke.com/soldersmoke225.mp3

Mars,  West Coast smoke.

Pete's Activities: 
-- DC receivers.
-- CW offset
-- GQRP talk
-- The uSDX project

Bill's Bench
-- Sliding into the Vintage Test Gear Cult:  HP8640B . 
-- Fixing up and figuring out Radio Shack DX-390 receivers.  
-- 220 to 110 on a few remaining devices.     
-- Got myself a Dremel-like rotary device.  

Tech News: 
-- ARRL/TAPR Convention:  SDR project from Walla Walla University students.   Intuitive explanation for why desired and image freqs in a mixer come out with very useful phase differences.  

-- Chuck Adams' Amazing Lab Notebook.   Includes a simple circuit to measure resistance and Q in crystals.  FB. 

MAILBAG: 

-- Dino KL0S  SITSing in his shack, homebrewing 9 MHz filters  FB Dino.  Airborne! 
-- Dave NT1U sent us the famous 1968 QST Article by W7ZOI re DC RX.  
-- Ron K0EIA listening to SWBC staions with uBITX.  
-- Ted AJ8T  Korguntubes making a 12AX7 equivalent.  
-- Joel N6ALT sent me a nice DX-390 manual.  Thanks Joel
-- Bob KD8CGH alerted us to the uSDX project -- story on the blog. 
-- Craig AA0ZZ Sent a great message with insights on computer code -- I will put up on the blog. 
--Tracy KN4FHX reports on optimistic prognosis for SolarCycle 25.  Some chickens may have to be sacrificed.   
-- Stephen M0OMO Thanks SolderSmoke for rekindling interest in this hobby. 
-- Paul VK3HN  has a cool new rig -- The Prowler -- check it out
-- Steve N8NM working on his Sunbeam car -- Pete already knew about the carburetor synch problem.  N6QW knows everything. 


Sunday, September 13, 2020

HP8640B -- Fault Found! A very TINY and Hard-to-Fix Fault


I've been troubleshooting the internal counter in my HP8640B signal generator. The generator itself works fine.  And the counter works fine for all signals coming in on its "external" port.  But the internal counter stopped working properly above 16 MHz. So I started digging into the manuals and the schematics, re-familiarizing myself with the digital logic behind pre-microcontroller  frequency counters.  NOTE:  If you are working on one of these, be sure to be using the correct version of the manual and schematic. At one point I found a really nice high def copy of an HP8640B manual (for one used in a Patriot Missile System!) only to discover that MY A8A3 board was significantly different from the one in this manual.  BAMA provided a manual that matched my device:  http://bama.edebris.com/manuals/hp/8640b/

Every dark cloud has a silver lining.   Here, the silver for me came from opening up the HP8640B.  What an impressive looking piece of gear.  It looks like something from the Apollo command module, or perhaps from a nuclear weapon.  "The RF source is a 256 to 512 MHz cavity-tuned oscillator that is mechanically tuned..."  There is phase lock circuitry.  The are AM and FM modulators and a really useful array of attenuators.  There is a frequency counter with an external port and an internal frequency counter that measures the original 256-512 MHz signal, then divides down to give a very accurate readout of the output frequency.    This is the kind of device that would generate a cult following.  Count me in! 

Also,  I've sometimes lamented the lack of VHF test gear on my work bench -- the HP8640B could really help me move me into the VHF range.

I started the troubleshooting with some observations and noodling. At what frequency did the internal counter stop working?  What did the readout look like when it stopped working?  What device failure could lead to these symptoms?  I was aided in this by suggestions sent in by readers of my previous blog posts.  Thanks guys.  

I was just getting ready to start some intrusive testing on the logic devices in the internal counter when Dave VE3EAC sent me this: 

-----------------
I think you might be overthinking the failure mode here. I had a similar problem with my unit and it was one of my early Covid-fix-it projects. There is an assembly that controls the bands on the front. It has the famous gears that crack. On the back side are two sets of rotary switches that control a lot of stuff. The switches are of a very unique HP design and offer a lot of advantages over traditional switches EXCEPT they fail in an unusual manner. A PC board has all of the interesting wiring and very tiny double leaf springs short tracks together as needed. The springs tend to break away from the plastic posts on the rotating plate and not make the needed contact. Very carefully examine the insides of the 8640 and your bench top to see if any have fallen out. These are difficult to buy or fabricate. The disk is designed to be rotated 180 and use a new set of posts to locate the springs. Use a small dab of epoxy to set in place. The totally mechanical repair fixed my unit that also would not read above 16 MHz. There are a number of web pages that give great detail of this repair. Also it is worth while to replace the Delrin gears if they are cracked. Replacement brass ones are available on eBay and they will permanently fix the gear problem.
---------------

I had thought about the problem being in the frequency range switch, but I had sort of tested for this by slowly rocking the switch through various positions as I watched the display.  A dirty rotary switch will usually allow the circuit to intermittently work as you rock the switch.  But this didn't happen.  And the HP switch felt quite sturdy, so I focused on the circuitry.  

When I got VE3EAC's message, I carefully flipped the HP8640B over and for the first time opened the bottom of the compartment.  The bottom view is much more impressive than the top view: 


The switches that VE3EAC wrote about  are just below the ribbon cable near the center front. I could see the little springs that he was discussing on the switches.  They appear MUCH more delicate than the rotator on a standard rotary switch.  And I didn't see any of them lying around below the switch.  But when I tried to flip the HP8640B over, something in there moved and caught my eye.  I pulled out some tweezers and pulled this out: 


Wow.  That little spring contact fell off the switch.  That was preventing the HP8640B internal counter's time base from changing as I went above 16 MHz.   It is ironic that such a big and solidly built device such as the HP8640B should be laid low by such a TINY part.  

This gets me back to my original question:  Discretion or valor?  Getting that spring back onto that switch will not be easy.  VE3EAC sent me this K6JCA link describing how to do this.  Yikes, it even requires the purchase of a special tool!  

I'm going to let the HP8640B sit there with the cover off for a while.  It will be taunting me, challenging me to fix it, to make it work the way Hewlett and Packard intended.  It may take a while, but I think I'm going to have to accept this challenge. I've become  real fan of the HP8640B and it would be a shame to leave it wounded like this. 

Wednesday, September 9, 2020

Dalibor Farny: Making Nixie Tubes in a Castle in the Czech Republic


“Our customers are interested in technology – some people buy paintings for their wall; our customers buy a technical piece of art. I think they appreciate the fact that someone is keeping old technology alive and they want to support us."

Dalibor Farny is manufacturing Nixie tubes and devices that use them.  He is working out of a castle in the Czech Republic.  Above is a video about his renovation of his workshop.  It was nice that he involved his kids in the project. 

This article tells his story: 
https://hackspace.raspberrypi.org/articles/meet-the-maker-dalibor-farny

Here is his website: https://www.daliborfarny.com/

YouTube Channel: https://www.youtube.com/channel/UC0IY1BQiMehWMvezqWLyk4g

Friday, August 28, 2020

Andreas Spiess (The Guy with Swiss Accent) -- Workshop Tips


Thanks to Paul Taylor VK3HN for alerting me to the YouTube channel of Andreas Spiess.  There are lots of great projects there, including several videos on building an Oscar 100 ground station.  

In the video above, Andreas talks about his lab/workshop.  He is more focused on digital projects than I am, but I found many of his tips applicable to the analog world. And of course the more digitally oriented readers will find Andreas's observations especially useful. 

I was sold on this video when Andreas reached to his book shelf and showed us Tracey Kidder's "Soul of the New Machine."   That is the book that brought the word "soul" into the SolderSmoke lexicon. 

There are many great videos on Andreas's channel.  I found his Playlists page to be a good way to see the many different catergories of his projects: 

https://www.youtube.com/c/AndreasSpiess/playlists

Thanks Andreas. 

Tuesday, August 25, 2020

Great Video on PC Board Techniques, with a Focus on Surface Mount


Wow, lots of wisdom in this video from Leo Fernekes.  Great hints and kinks on prototyping with copper clad boards. I need a Dremel just so that I can make Leo's board cutter.  And I can see that I need some of that liquid flux and isopropyl alcohol. Surf boards and headers! Who knew?  Teflon coating for the wires -- gotta get it. Glad to see that Leo is also a fan of copper tape.

His emphasis on the importance of stage-by-stage construction and testing is right on the mark.  

My only disagreement with Leo is about his use of steel wool.  I've found that steel wool will inevitably cause little tiny "Murphy Whiskers" to float around your workbench. They will eventually settle onto the most inconvenient and damaging place on your board.  So I have banished steel wool from my workshop.  Those green, non-metallic Scotch Brite pads work just as well and don't cause shorts. 

Three cheers for Leo. He is based in Thailand.  He has an interesting background and some really amazing projects and insights:  

http://www.luminati.aero/leofernekes

http://www.fernekes.com/blog/

https://www.youtube.com/channel/UCe1bjEcBichpiAMhExh0NiQ/videos

Thanks to Tore LB4RG for alerting us to Leo's video.  

Monday, August 3, 2020

Homebrew Resistor Kit -- Drew's Mouser BOM

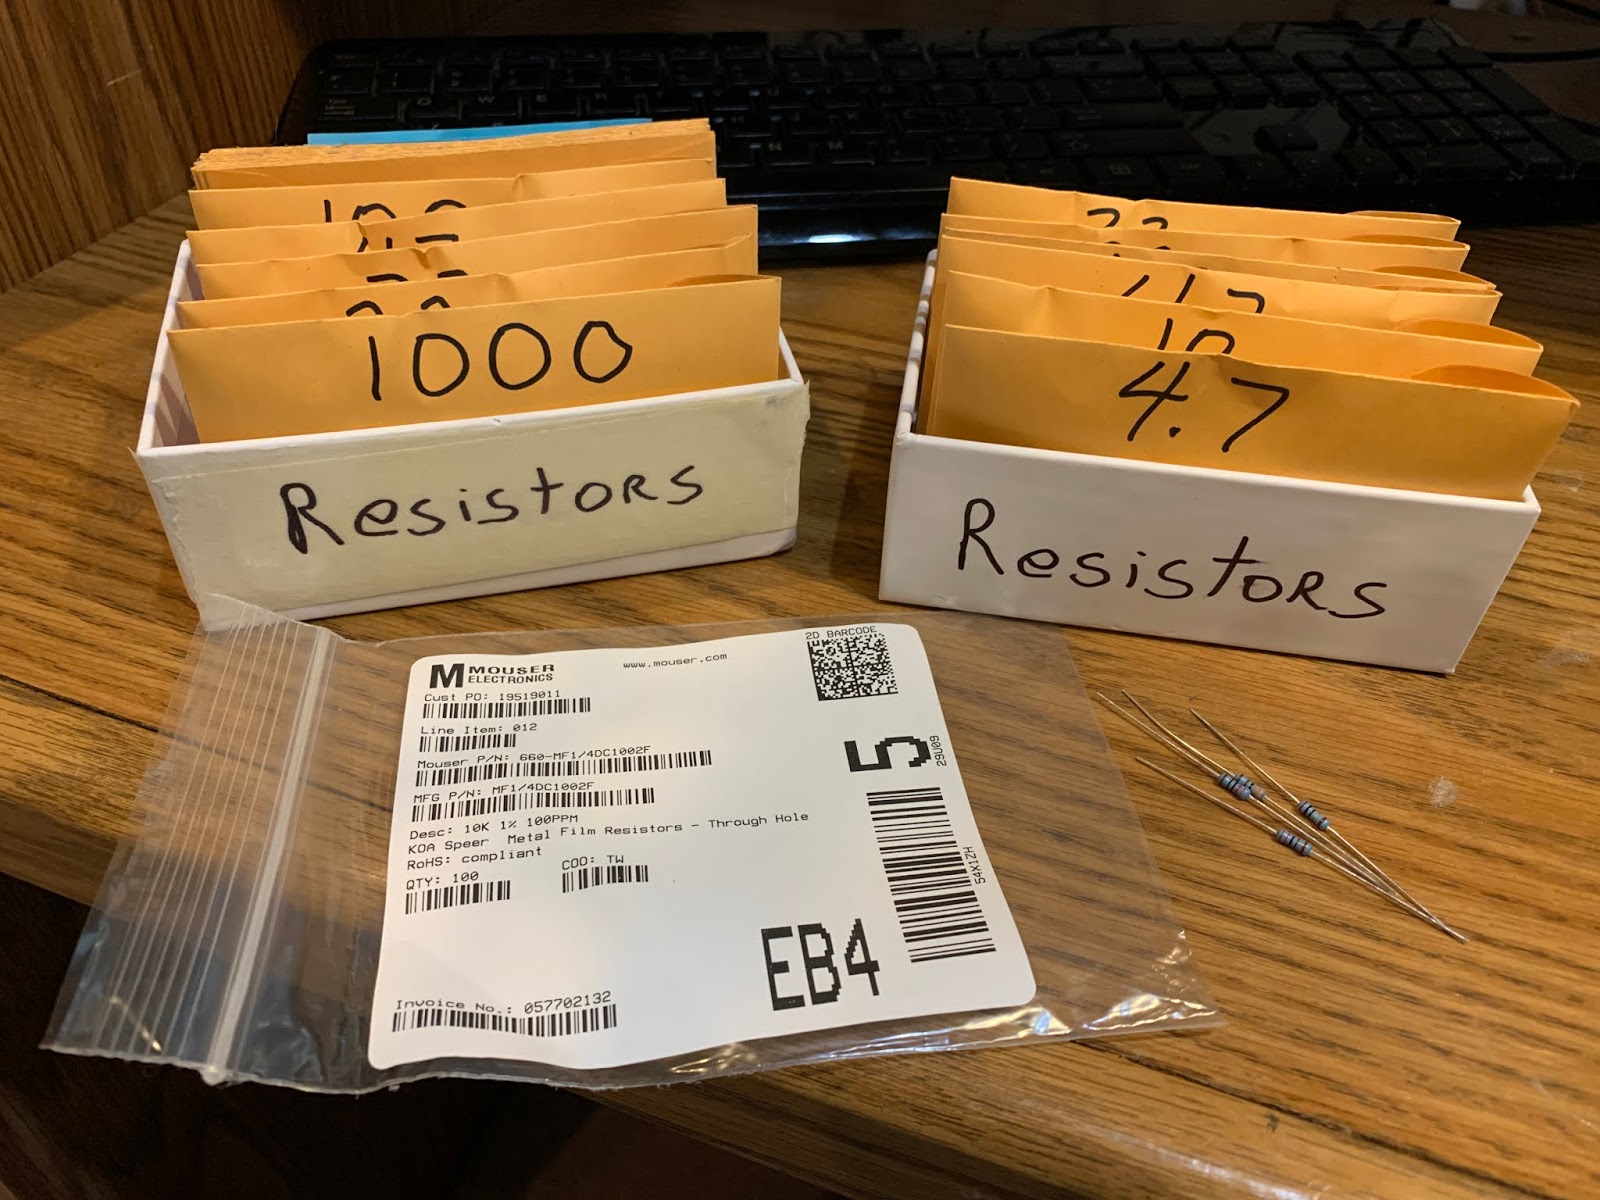
I put the resistors in parts envelopes and cardboard boxes

Hi Bill,

You mentioned wanting to get a resistor kit.  If you'd like, I can
help you do what I did.


Then I noodled about it a bit.  And looked at mouser.

A tiny bit of code put together a copy and paste list of part numbers
that I pasted onto mouser's BOM order form.  And bob's your uncle.

In my case, a particular manufacturer's 1/4 W metal film 100 ppm as
they were 1.9c @ 100 pieces.  I created a copy and paste BOM for E6
over 4 decades plus E3 for a 5th and 1M and 49.9 ohms. Less than $2
per value for 29 values.  Not a bad price for the size of the resistor
kit.  I also figured if the value gap was too large, I could fill it
in with the other half of the E12 series.  (E6 series is every other
E12 series value.)

This could be tweaked.  Perhaps fewer resistors in each value.  Or add
some more special values or whatever.

Mouser was kind enough to cut tape and put each value in a flat
plastic baggy with a label as to what was inside.  Sorted in a file
box, it's a snap to grab a resistor.
Perhaps this is something I should post online to share?  Maybe
someone else already has?

On my todo list is to construct my self a homebrew BOM of capacitors.

If you're interested, I could update this and let you know what Mouser
can do for you.  It may not be your preference, but it is an
interesting option.

Best regards,

Drew
n7da

--------------------------------

Drew:   Your message caused me to think about what I really need in a resistor kit.  I have been using some other resistor kits, but I end up using ALL of certain values and NONE of others.  Your message made me realize that there is valuable data in those old kit packages.  

I took a look a them this morning.   It seems I use the following values:  4.7, 10, 47, 100, 220, 330, 470, 1k,  2,2k, 3,3k, 4,7k, and 10k.  That's about it.  So maybe I just need to go to mouser and order, 50 of each.  I'm thinking 1/4 or maybe 1/2 watt? 

The packaging you describe sounds great.  How can I get Mouser to do that for me?  

I don't think I need the more sophisticated approach you used, but I'm sure we have listeners who could benefit from it. 

Any further suggestions?  

Thanks again,  

73  Bill 
-----------------------------

Hi Bill,

Sounds very good.  It turned out to be simple for me to order a
ridiculously well stocked resistor kit, but doing something custom is
actually a great idea.  If you want both 1/4 and 1/2, get both.  (I
figured I could always make a 1/2 W resistor out of 2 1/4 watt
resistors.)

The packaging is just what they do.  No extra charge other than their
regular shipping and handling.

So, I did this in late 2018.  When ordered, two values were
backordered, but they shipped them out a month or 6 weeks later or
something.  Checking now, 660-MF1/4DC1000F (a 1% 100 ohm metal film
1/4 watt), I see it is out of stock with an ETA of June 1st for 10K
they are ordering.  The other P/N that was backordered was
660-MF1/4DC1503F.  Who knew 100 and 150K ohms were extra popular?
150K is in stock right now BTW.  Maybe it's random what they run out
of?

Best thing is you copy and paste your list of P/Ns and quantity for
each and bam Mouser will tell you pricing and if anything is
backordered, etc.  If you don't like what you see, change your list
and try again.

I actually thought about what I wanted, then looked at Mouser to see
what they had and what the pricing was on it.

So, from this particular resistor family, I see the pricing is what it
was a couple of years ago.

if you order 50 pieces of that 150 or 100 ohm resistor, that is:
50*$0.055 = $2.75 for 50 resistors.

If you order 100 pieces of that 150 or 100 ohm resistor, that is:
100*$0.019 = $1.90

IT"S CHEAPER TO ORDER 100!  Well, at least for this resistor family
and for Mouser's price breaks.  You have to look at the price breaks
versus volume.  And of course, understand the minimum you need and the
maximum you can store in your lab.  :-)  Don't be ordering 10,000.
:-)

So, price breaks for these they show:

Qty.    Unit Price
1    $0.23
10    $0.055
100    $0.019
1,000    $0.014
2,000    $0.009
10,000    $0.008
25,000    $0.007

You can see that there's a good break at 10, 100, and 2,000.  The
quantity with a good break really depends, so you would have to look
at different vendor product families to see.  I don't think I looked
very long.  I probably knew I wanted 1/4 W (may have considered 1/8 or
1/2, don't remember).  I also think I knew I wanted metal film.  When
I saw the pricing on these at 100 pc and with 1% tolerance (so I could
double out to E12 series and have it make sense if it turned out to be
useful for me), I stopped shopping.

Here's the full BOM I ordered.  The top part is some extra parts I
wanted and those couple of special resistor values.  The lower part
was generated by just a few lines of python:

-----
G6K-2F-Y-DC12|8
1N4007FFG|100
1N4448|100
2N3904TAR|100
2N3906TAR|100
2643000101|100
2643002402|25
2673002402|25
2661000101|25
1C10X7R104K100B|50
1C10X7R103K100B|50
ECA-1HM101|25
ECA-1HM100|25
TIP29CG|5
TIP30CG|5
1N5355BG|10
PR01000104700JR500|10
PR01000102200JR500|6
MF1/4DC1800F|20
MF1/4DC2400F|20
MF1/4DC36R5F|10
FC2053-440-A|100
MF1/4DC16R5F|20

MF1/4DC10R0F|100
MF1/4DC15R0F|100
MF1/4DC22R0F|100
MF1/4DC33R0F|100
MF1/4DC47R0F|100
MF1/4DC68R0F|100
MF1/4DC1000F|100
MF1/4DC1500F|100
MF1/4DC2200F|100
MF1/4DC3300F|100
MF1/4DC4700F|100
MF1/4DC6800F|100
MF1/4DC1001F|100
MF1/4DC1501F|100
MF1/4DC2201F|100
MF1/4DC3301F|100
MF1/4DC4701F|100
MF1/4DC6801F|100
MF1/4DC1002F|100
MF1/4DC1502F|100
MF1/4DC2202F|100
MF1/4DC3302F|100
MF1/4DC4702F|100
MF1/4DC6802F|100
MF1/4DC1003F|100
MF1/4DC1503F|100
MF1/4DC2203F|100
MF1/4DC3303F|100
MF1/4DC4703F|100
MF1/4DC6803F|100
MF1/4DC49R9F|100
MF1/4DC1004F|100
-----

So, your BOM (4.7, 10, 47, 100, 220, 330, 470, 1k,  2,2k, 3,3k, 4,7k,
and 10k) would be the following.  Added the 4.7 by hand and deleted
the other values by hand.  Qty 100 each.
-----
MF1/4DC4R700F|100
MF1/4DC10R0F|100
MF1/4DC47R0F|100
MF1/4DC1000F|100
MF1/4DC2200F|100
MF1/4DC3300F|100
MF1/4DC4700F|100
MF1/4DC1001F|100
MF1/4DC2201F|100
MF1/4DC3301F|100
MF1/4DC4701F|100
MF1/4DC1002F|100
-----

Mouser.com.  Services & Tools button.  BOM Tool button.  Login (they
want account for the tools.  I can't complain.)  Upload spreadsheet or
copy and paste.  In this case, copy and paste.  In fact, copy right
out of this draft email and into their tool.  Next.  Then they ask me
for a name for the BOM and if I only want RoHS.  (RoHS is up to you.
I picked only RoHS, because I know all these parts are RoHS and it
won't warn me about lead poisoning or anything.)  Process BOM.
Blammo.

I had the 4.7 wrong, but they figure it out.  Ouch.  Pricey.  Maybe
you don't need so many, but $4.6 for 100.  Parallel a couple of 10
ohm, you'll have less parasitic L in your emitter circuit.  Change the
BOM before you click the add all to cart.  No problem.  Or maybe 4.7
is worth the extra money to a high roller such as yourself.  :-)

2 parts are at 0 inventory.  The 100 we knew about.  470 as well with
6K arriving 15June.  Yes, those ETAs are perhaps questionable.  Dunno.
They will ship you what they have and ship the rest later AT NO EXTRA
CHARGE.  :-)

A third part is at 123 pc inventory.  Act now before they are all out!
:-)  220 ohms.  6K due end of June.

The above would be $25.50 plus less than $10 for their cheapest
shipping option.  Not a bad price for a well stocked CUSTOM kit and
it's really easy to do.  And these are good parts with specifications
and tempcos etc. all in the data sheet.  Sure, you don't need it 99%
of the time, but if you wanted it, because you were doing something
fussy, you have it.

You could cut that price down quite a bit if you went carbon or wider
tolerance.  (Who needs 1%?  This is electrical engineering, not
mechanical engineering!)  Or maybe another manufacturer.  It's easy to
browse on Mouser and figure out those other options quickly and what
it may do to help you out.  Of course, when you get to a price of
$0.00, you still have the flat rate cheapest Mouser shipping as the
floor on what price you can achieve.

Mouser will also give you a print and email with price, part number,
description of everything in your custom kit.  And each pouch is
labelled.  Crazy!  :-)

Another crazy thing is with these BOMs is that you can easily share
them with others.

Best regards,

Drew
n7da

Tuesday, June 9, 2020

NanoVNA, Millen Dip Meter, Kilo-Megacycles, and Measuring the Speed of Light (Video)


Yesterday my NanoVNA arrived.  This morning I was looking for info on how to use it and I found this really wonderful video from Joe Smith.  

Wow.  Joe gives a really useful intro to the capabilities of this amazing little device. He even reaches back in time and compares NanoVNA results with those obtained by a Millen Grid Dip Meter.  He pulls out of his junk box an attenuator that is so old that it is marked in "Kilo-Megacycles."  (Shouldn't we revive terms like that?)

Joe also gives us a taste of what it is like to live and work in the GHz range.  He warns us never to touch the SMA connectors on our NanoVNAs (too late Joe).  And -- get this -- he uses a torque wrench to connect the little SMA coax connectors to the NanoVNA.  I'm not kidding.  A torque wrench.   Joe connects surface mount capacitors and inductors that have their values specified not only in picofarads and microhenries, but also at the specific frequency at which they were measured.  

My understanding of the Smith Chart was greatly improved by watching Joe's video. 

Icing on the cake:  Joe wraps up the video by using the NanoVNA to MEASURE THE SPEED OF LIGHT.  Great stuff.  Thanks Joe.  

Here is Joe Smith's YouTube channel:  
https://www.youtube.com/channel/UCsK99WXk9VhcghnAauTBsbg

Now I have to get the software to use the NanoVNA with my computer. 

Sunday, May 31, 2020

AJ4SN Homebrew


OM Stan AJ4SN reports that his operating position is on the left. The workbench is on the right.  FB. 


I like the Turner +3 Transistorized microphone. 

Thanks to Ed B. for the link. 


Saturday, May 30, 2020

An Amazing Catalog of Circuits from HA5KHC


HA5KHC is a club station in Budapest, Hungary.  The photo above shows a portion of their worshop.  The link below is for their really amazing collection of links to ham radio circuits. 

http://konstruktor.ha5khc.hu/linkgyujtemeny/linkgyujtemeny.htm

Saturday, May 2, 2020

A Toroid Winder from the Wizard of Wasilla -- Paul KL7FLR


Paul KL7FLR has been sharing tribal knowledge with us for several years now.  He recently provided insights on how to tap threads into metal.  In 2017 he told us about his Alaskan road-kill microphone.  And in the midst of the current quarantine he built this really neat toroid winding tool.   Winding coils is often a show-stopper for would-be homebrewers;  Paul's device should help then get past this perceived impediment. Thanks Paul! 

Paul writes: 

A few weeks ago I needed a way of holding a T37-6 toroid to wind an LP filter coil. Being of the fumble fingered crowd I slapped together a quick and dirty holder using a crudely tapered ¼” wooded dowel. As fate would be, I soon needed to wind some other coils of a larger diameter and my wham bam holder wouldn’t do the job. Time to make a holder for more than just one size with the materials I had on hand.


I measured the id of the smallest toroid and the largest toroid I had and plugged them into an online taper calculator. https://www.easycalculation.com/shapes/taper-degree-calculator.php. Calculated taper was 6.65 degrees so I settled on an even 6 degrees with a length of 1 1/2”.  The final of the taper was extended to 3”.  Using my small 6” metal lathe I set the compound to 6 degrees and chucked up a 4” piece of a ¾” wooden dowel. I would have liked to have an ash, maple or other hardwood dowel but I used what I had on hand. Then I turned the 6 degree taper for 3” until the smallest end was 1/8” making the large end almost ¾”. Some sanding with 320 grit sandpaper followed by some ultra-fine 400 grit made it ready for a coat of clear sealer and a quick stain.


Moving over to the milling machine, I set the 6 degree angle with a 6 degree parallel in the vise.  Positioning the mill spindle to the center of the dowel I used a #0 center drill to mill a slot the entire length of the taper to about .015” deep as I didn’t have a 1/32 end mill.  This slot also can be accomplished with a rotary tool or a hobby knife and a steady hand.


I had a couple of 6-32 wood brass insert nuts in the hardware bins. Believe I bought these at Lowes and the Hillman part #880546 is what I used. Drilling a 3/16” diameter hole ½” deep I screwed the insert in until it was flush with the bottom of the dowel. My previous toroid holder had a wooden base but it proved to be too light and easily moved around on my bench.  I dug out a scrap hunk of ¾” steel about 2.5 inches square.  I then drilled a hole through the base using a #27 drill. Now the toroid holder can be mounted on the steel base using a 6-32 machine screw about 1 ¼” long and removed for a different size spindle when necessary. A wood base can also be used with appropriate length wood screw. Be sure to drill a pilot hole large enough in the spindle to prevent from the wood screw from splitting the spindle. A #6 wood screw long enough to pass through the base and into the spindle about ½” would be adequate.

Winding consists of passing the wire up (or down) the slot, lifting the toroid up and rotating slightly and back down on the spindle for the next winding. This has proved to be a very useful fixture when needing to wind some toroid coils.

The picture at the top shows a T-37-6, T50-2 and a T68-2 top to bottom. Will also fit a up to a T-106. Any larger toroids would require a larger spindle to be made.

Enjoyed your YouTube “Quarantined Receiver”  and all the doings from Pete.

Paul
KL7FLR

Thursday, April 30, 2020

Wednesday, April 22, 2020

Jonathan-san (Our Man in Japan) Now Melting Solder in Seattle


Got a nice note from Jonathan W0XO.  He and the family  have relocated to the Seattle area.  Here we see Jonathan at work in his new shed/shack.  It looks great. 

Long-time SolderSmoke fans will remember Jonathan from his previous life in Asia. See: 

Designer: Douglas Bowman | Dimodifikasi oleh Abdul Munir Original Posting Rounders 3 Column