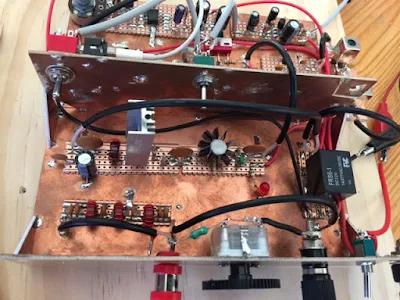
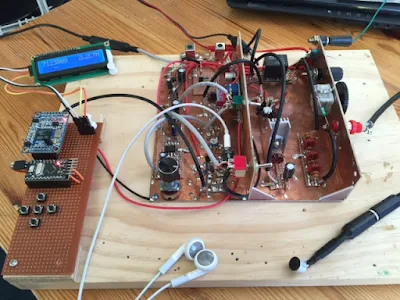
New Zealand and Australia seem to produce an amazingly high percentage of the world's double sideband transceivers. Charlie ZL2CTM adds to the count. He took inspiration and circuitry from DSB hams in both countries and produced this beautiful DSB transceiver. It is obviously -- as Charlie notes -- chock full of soul. I definitely identify with his comment about "taming some kind of electro-mechanical machine" and also, of course, with his remark about the feelings that come with putting a homebrew rig on the air. So follow the advice of Charlie! Build a DSB rig and put it on the air! Make this your ham radio resolution for 2016! Give it a go!
Hi Bill:
I have been following you and Pete Juliano for many years now, and thought I would send you a photo of my 40m homebrew rig that I finished yesterday. Hopefully, it will help encourage others to melt some solder and make their own rigs. The rig is based on ideas and designs from Eric Sears ZL2BMI, Peter Parker Vk3YE and of course Pete N6QW. The aim is to make the final version relatively compact so I can take it tramping/hiking here in New Zealand.
The VFO is an AD9850 being controlled by an Arduino Pro Mini. The output is amplified to provide sufficient drive for the balanced modulator. I was using a nice 1” OLED screen to show the frequency, but that generated a huge amount of noise, so I changed to a LCD. Changing frequency is simply a matter of moving the curser left and right then using the up and down buttons to change the number. Very quick and easy. I was contemplating a rotary encoder, but I find those always seem to skip and jump every now and then. Must be the way I use them...
The balanced modulator is a 4148 diode ring. I do have some SBL-1s lying around, but I thought I’d go with the discrete diode ring for something different. I’m using a standard electret mic and a simple single stage amp. The switch above that switches between phone and CW.
The PA is two stages; the first a 2N3053 and the second a BD139. At this stage it puts out just over 1W into a 50ohm load. I might look to add another stage and get that up to 3-5W.
The audio amp is a simple LM386. I am not running it hard out as per the datasheet as it generates quite a bit of high frequency hiss in that configuration.
Unlike Pete, I don’t have access to a milling machine to make squares to mount the components on. Instead, I use vero/strip board upside down and solder directly to the strips. This works really well for me on HF. I cut tracks with the twist of a small drill bit.
Last night I made two contacts with the rig. The farthest was 527km according to some well known mapping software. Both reports said the audio was ‘very nice’, which was great to hear. The receiver worked surprisingly well too, and I managed to hear stations in Europe.
As for user controls, you will notice that the pots, switches and plugs are all over the place. I did that to keep leads short. I like it as i feel like I am taming some kind of electro-mechanical machine to generate and receive RF.
Anyway, this little rig has a ton of soul in it and is really fun to use. There is something different about making a contact with a rig you built. I really encourage everyone to give it a go!
The next iteration will be a SDR using a Teensy. Rheslip over at Open Emitter has done some great work with that.
73s
Charlie
ZL2CTM


Wow!
ReplyDeleteCharly, well done!
Greetings from Mainz, Germany, Axel
where is schematic ?
ReplyDeleteI'll look to draw one up in the next day or so and put it up on QRZ.com
Delete