Serving the worldwide community of radio-electronic homebrewers. Providing blog support to the SolderSmoke podcast: http://soldersmoke.com
Podcasting since 2005! Listen to Latest SolderSmoke
Wednesday, April 16, 2025
Homebrew vs. Kits -- The influence of Russian Homebrewers
Tuesday, January 7, 2025
Steve G0FUW talks Homebrew and Kits with Charlie NJ7V
Our homebrew direct-conversion receiver challenge (see below) has led to a discussion of the differences between homebrew and kits. Our intent in designing this rig was to come up with something that was simple enough to actually homebrew (that is the challenge: homebrew it!) . Building it from a kit would be something different. I like the way Charlie and Steve talk about the differences between homebrew and kits in this video. Around 33:49 Charlie mentions that after a while you just get good at building kits. Steve points out that building kits is a bit like "painting by numbers" (a great metaphor). Steve then goes on to talk about the formation in G-QRP of the "scratch-built group." Steve tells us that he has built some 84 radios. Steve talks about "the joy of building it yourself" (43:49)
Steve gives a very kind shout out to SolderSmoke at around 23:58. The references to Tony G4WIF and Ian G3ROO were also very nice. And there are many great mentions of Pete Juliano N6QW.
And remember: If you are not a member of G-QRP you are just wrong! Join here: https://www.gqrp.com/join.htm
Thanks Charlie and thanks Steve!
------------------------------------
November 13, 2024
Bill's appearance on the Ham Radio Workbench. (Bill made some overly harsh comments about radio rejuvenation, and was trying to make amends.) But now we throw down the gauntlet. WE CHALLENGE the HRWB guys to build -- to homebrew - our TJ DC RX. They will experience JOO, JVO and the elite status that comes with having built their own ham radio receiver. And if they go on to build a 10 minute transmitter, they can use it for CW contacts. Like on POTA (Thomas!)
December 13, 2024:
Bill was on Ham Radio Workbench: https://soldersmoke.blogspot.com/2024/11/bill-n2cqr-appears-as-guest-on-ham.html Our challenge to HRWB. Gauntlet thrown down... OUR CHALLENGE HAS BEEN GRACIOUSLY ACCEPTED! We now extend the challenge to the entire SolderSmoke community: Build one of these: https://hackaday.io/project/190327-high-schoolers-build-a-radio-receiver
Homebrewing is not for the faint of heart! Accept the challenge! Build stuff!
Saturday, January 4, 2025
Donnie WA9TGT's Direct Conversion Receivers
Monday, March 11, 2024
Radio Items Picked-up at VWS Winterfest 2024 Hamfest
-- Behind the MXM there is a nice box marked "Diode Detector" I opened it up and there is just a solid state diode and a 50 ohm resistor to ground. Box may be useful.
-- I got a couple of books: "Weekend Projects" 1979 from ARRL, and "A History of QST -- Volume 1 Amateur Radio Technology 1915 - 2013" 2013 from ARRL.
-- On top of the Weekend Projects book you see a "Crystal Holder" from Gross Radio of New York City. W1UJR has some good history on this company: https://w1ujr.com/written-word/gross-radio-company-circa-1931/ This device seem to be intended to hold in place a raw piece of quartz! Cool.
-- To the right of the books there is a serious-looking VFO. One dollar! Deal! It is a CB VFO, but the markings say it puts out 5.44 to 5.99 MHz. So it should be useful. The dual speed dial is very nice.
-- Above the VFO is a nice step attenuator from the "Arrow Antenna" company of Loveland Colorado.
-- Further to the right are some Electric Radio and Antique Wireless Association magazines that Armand WA1UQO gave me. Really nice. The AWA mags have a very thoughtful piece (warts and all) on Jean Shepherd. And the ER pile has an article by Scott WA9WFA that mentions my work on the Mate for the Mighty Midget receiver. Thanks again Armand!
-- I also got some ADE6+ surface mount mixers. The price was right!
Thanks to VWS for putting on this great hamfest!
Wednesday, January 3, 2024
Saturday, May 27, 2023
Hans Summers G0UPL and his new QMX: The Bob Crane W8SX FDIM Interviews Part 1 (audio)
We are very pleased and grateful to present this year's series of Four Days in May interviews by our FDIM correspondent Bob Crane W8SX. Once again Bob did an outstanding job interviewing the FDIM participants.
In this interview, the amazing Hans Summers talks about his latest QRP Labs kit, the QMX. It is a combination of the QCX Mini and the QDX.
Hans explains the M: QMX. The M is for Marriage. Magnificent. Merger. Marvelous, many things like that. It’s what you get when you marry the mechanical and conceptual design of QCX-mini, with the SDR, multi-band digital implementation of QDX. Simply: QDX + QCX-mini = QMX.
It has a very clever switching power supply that automatically adjust to prevent spurs and harmonics from the power supply from appearing in the band of interest.
I was especially interested in his plans to implement an SSB option in future software updates. Hans will use the same very complicated SSB generation scheme used in the trueSDX rig, but hopes to achieve higher performance and improved signal quality due to the much more robust hardware of the QMX.
Here is the interview:
http://soldersmoke.com/G0UPL23.mp3
Here is the QRP Labs site about the QMX: http://qrp-labs.com/qmx.html
Here is the QRP Labs web site: http://qrp-labs.com/
And here is a really wonderful and very current article by Hans on the evolution of QRP Labs and its rigs from 2010 right on up through 2023 and the QMX. It is really interesting:
http://qrp-labs.com/images/qmx/docs/fdim2023.pdf
Thanks to Bob Crane W8SX, Hans Summers G0UPL, and all of the FDIM organizers.
Thursday, May 25, 2023
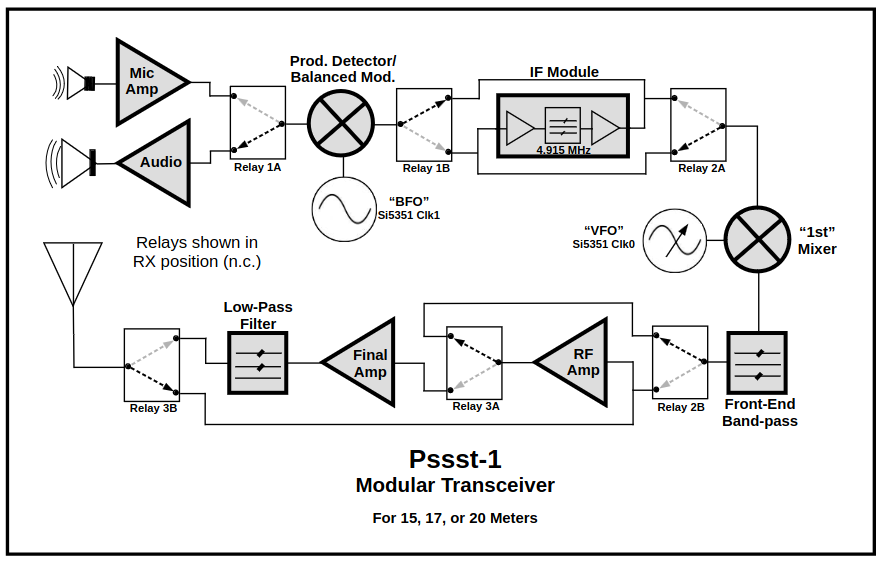
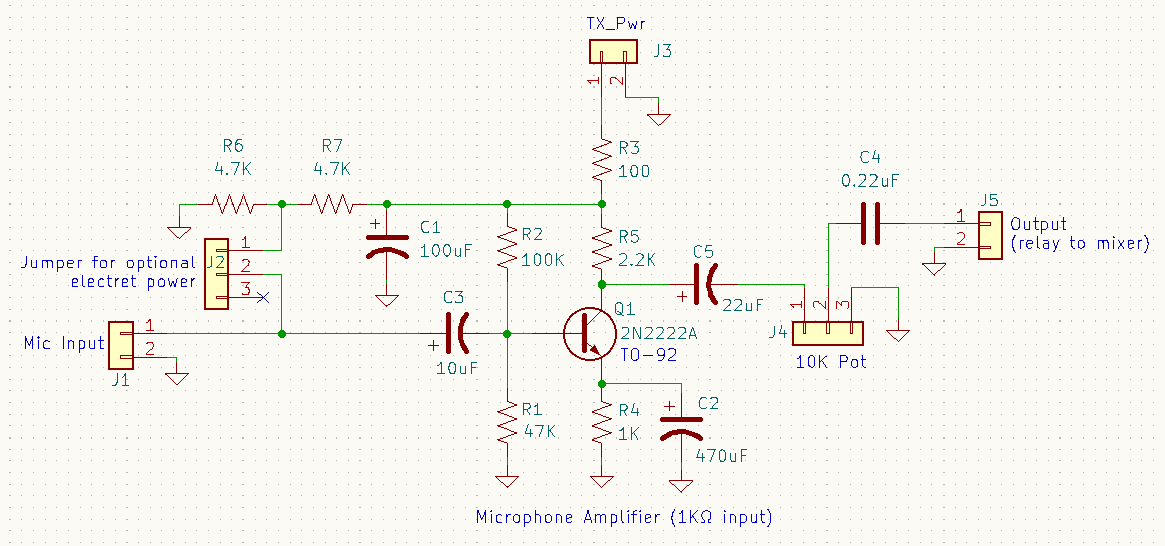
PSSST! MostlyDIYRF Will Sell a Kit of Pete's Rig!
From the wizard of Newbury Park!The Pssst Transceiver Kit | |||||
 | |||||
 | |||||
Available on the 150th birthday of Lee DeForest, the inventor of the Triode (August 26th) |
Monday, June 27, 2022
Thoughts on Homebrew, Makers, DIY, and Hams -- from Lex PH2LB
Sometimes we get a comment that is so good that we elevate it to the main blog page. That was the case with Lex PH2LB's comment on the blog post of Owen Duffy (yesterday).
----------------------
When I started the hobby, it arose out of technological curiosity, the interest in understanding things and the will to make things myself (designing myself was not my main goal). It doesn't matter to me whether it is 100% DIY or a kit (such as Heathkit, Elecraft, QRP-Labs etc) which is modified or not after construction. Just having fun with the hobby and pushing boundaries. And yes I also have some off-the-shelf transceivers (I'm super happy with my FT817ND) and my QO-100 uplink is also a kit (which is then already soldered a little more than average). As far as new tools are concerned: here at home are 2 types of 3D printers, various tools for SMT assembly, and I have a nice workshop equipped with tools and equipment for metal / plastic / wood processing. And every day I try to learn something new, because I stand by the IBEW moto : If you know stuff, you can do stuff.
Am I a maker then? I wouldn't call myself that. Just like I don't call myself a hacker because I'm quite handy with computers, technology and have certain skills. I'm just a hobbyist who wants to do and make things after work.Monday, June 6, 2022
SolderSmoke FDIM Interviews: Hans Summers G0UPL Talks about the QDX and His New Balloon Tracker
Thanks to Bob Crane W8SX for getting us this wonderful interview with Hans G0UPL. Its really amazing to hear Hans talk about how many QDX rigs and Baloon Trackers have been sold by QRP Labs, and how quickly they sell. Really great. Hans's comments on the realities of the parts shortage was also very interesting.
Listen here (about 7 minutes): http://soldersmoke.com/2022 G0UPL.mp3
Saturday, May 21, 2022
Repairing the Sony ICF SW1 Receiver -- Used for Numbers Station Reception? Why no replacement for C-625?
Monday, May 16, 2022
Some Links for the Michigan Mighty Mite and the Color Burst Liberation Army from Dave K8WPE
Dave K8WPE has been one of the podcast's best friends and one of its most loyal listeners. Dave was recently going through some back issues of SolderSmoke. This sparked a renewed interest in the Michigan Mighty Mite and the Color Burst Liberation Army. Dave sent us some useful links on this subject. (I had forgotten about the .io CBLA mailing list!) Thanks for this Dave, and for all your support and friendship over the years.
--------------------------------------------------------
Guys and Gals
Wednesday, May 11, 2022
Electronics Manufacturing in New York City -- Limor Fried and Adafruit (video) -- "TRUST YOUR TECHNOLUST"
Tuesday, January 12, 2021
Pete N6QW and Steve G0FUW Talk to RSGB About Homebrew (Video)
Tuesday, July 14, 2020
ON6UU's DB4020 EA3GCY Rig
Friday, April 17, 2020
Walter's VFO
 |
| Main VFO board under plastic -- buffer board off to the right |
Regarding the last line in Walter's article, please direct any complaints about drifting analog VFOs to Peter Juliano. He will be delighted to receive these complaints, and will promptly provide all correspondents with very succinct advice on how to overcome the instability.
I recently built a digital VFO (from a QRP Labs Kit) to see what everybody is talking about, and it has been quite handy for my first two-band homebrew transceiver, but by the time one adds the low pass filter, a low-level RF amplifier to boost the weak output, a 5 VDC regulator, and a hefty +12VDC power line filter to the beast to keep the digital noise out of the rest of the radio, for a single band project I still prefer a low-drift analog VFO.
My approach to minimizing drift is very simple and works well for a VFO range of 3 – 7.3 MHz, which is all that is needed for the 20 to 80 Meter bands, either direct conversion (adding a doubler for 20M) or single conversion with approximately a 10 MHz IF.
First, see my schematic (adapted from Small Wonder Labs 40+ transceiver, original BITX40 Analog VFO, and other sources) and wind an air core inductor with stout magnet wire such as 24 or 22 AWG. Use a thick, rigid plastic form of a diameter so that you need about 12 turns, and single coat with water-based sanding sealer, Q-dope, or similar. Use hot glue to mount the coil firmly to the single-sided circuit board, and build a cover of some type, especially if the radio is to ever be used outdoors.
Second, all the VFO capacitors (except power supply bypass) should initially be the modern C0G type, which can be obtained from Mouser (such as TDK FG28C0G1H681JNT06 or the like), which I trust more than those labeled NP0.
Then, power up the VFO and tweak the coil, tuning arrangement, and range capacitor to get the frequency range you desire.
Next, monitor the drift from a cold start to see how fast it is moving as it warms up, and whether it stabilizes nicely (my goal for SSB Phone use is less than 20 Hz drift during any 10 minute period) after 10 – 15 minutes maximum. If it does not stabilize to your satisfaction, then start substituting polystyrene caps for the C0G units one at a time until you are happy with the performance.
[Also remember that a stable BFO is important as well, and if you use the BITX 40 crystal oscillator design, I recommend installing a dedicated 78L09 power line regulator.]
If you build this VFO at the higher (7 MHz) frequency end, just change the inductor value to about 0.5 uH, with everything else about the same, but expect to do more tweaking to get stability, and the warm-up time may be closer to 15 minutes. After years of experimenting, this is what has worked for me. If it works for you, please send me an email (see my QRZ page) of thanks. If not, file a complaint with Soldersmoke.
Wednesday, February 19, 2020
Hi-Per-Mite Active Audio CW Filter Installed in uBITX (video)
Coming home from the Dominican Republic, this was a major item on my list of desired mods for the uBITX: a narrower passband for CW. Using the 2.3 kHz SSB passband, you could have many CW QSOs audible in your headphones. Narrow that passband to 200-300 Hz and life gets a lot easier.
Farhan had discussed adding a 12 Mhz IF filter of suitable CW bandwidth, but this seemed difficult to me. Besides, I have long wanted to use an active audio filter for this purpose.
The Hi-Per-Mite filter from 4 State QRP Group is just what I needed. I built the kit without problems in about an hour, then I put it in the uBITX box, with switch on the front panel that lets me put it in the circuit or take it out -- this is very satisfying and a lot of fun.
The Hi-Per-Mite just goes between the uBITX audio out and the speaker/headphone connection. I built mine for "no gain" -- the uBITX provides plenty of audio.
The selectivity with the Hi-Per-Mite compares favorably to that of my Drake 2-B with the 500 Hz LC filter. You can get an idea of the performance in the video.
Three cheers for the 4 State QRP Group and their Hi-Per-Mite! Here is the page with all the info:
http://www.4sqrp.com/hipermite.php
Saturday, January 18, 2020
The End Fed Half Wave Antenna and EFHW Tuners
In the SPRAT 179 (Summer 2019) article describing their Peregrino (Pilgrim) transceiver, Joan EA3FXF and Eduardo EA3GHS recommend the use of an End Fed Half Wave (EFHW) antenna. Their circuit incorporates an EFHW tuner and an SWR indicator. As I planned my trip to the Dominican Republic with a uBITX, I had this antenna system idea in mind. I was attracted by the possibility of avoiding having to carry coax with me. And it seemed that an EFHW antenna would be easier to get up in the air than a coax-fed dipole.
When searching for schematics for EFHW tuners I came across the QRPguys tuner kits.
https://qrpguys.com/end-fed-half-wave-sota-antenna-tuner
This looked like just what I needed, so I ordered one. But I placed my order kind of late, and I started to worry that I might not get the tuner kit in time. So I decided to homebrew my own (just in case!)
As it turned out, QRPguys got the kit to me in plenty of time. It went together very quickly and is a really useful piece of gear. My homebrew version works fine, but I prefer the QRPguys device.
You can check out the manual here:
https://qrpguys.com/wp-content/uploads/2019/09/efhw_40m_tuner_assy_090119.pdf
The circuits are interesting. The EFHW antennas present an impedance not of 50-70 ohms, but of 3000-5000 ohms. The Peregrino and the the QRPguys circuits use a matching transformer to change the high impedance to 50 ohms. In both circuits polivaricon capacitors are used to tune for resonance. The QRPguys circuit uses an N7VE LED absorption bridge -- I found it very satisfying to put the circuit into "tune" mode and then just adjust the capacitor until the LED went out. That means the antenna system is presenting 50 ohms to the transmitter.
SOTA beams has a good explanation of the EFHW antenna here: http://sotabeams.co.uk/efhw/
I did use a counterpoise.
Saturday, August 18, 2018
QSX! Hans Summer's New SSB Rig Revealed in South Africa
I liked this video. I liked Hans' description of his mechanical skills, and the way he has at times become a "human CNC machine."
This seems like a much more sophisticated rig than the QCX. I may be wrong, but QCX seemed to be essentially an analog phasing rig with a narrow CW audio filter. I kind of expected the SSB version to be a QCX with broader filter, but QSX is a different, more sophisticated, SDR rig.
Once again, three cheers for Hans Summers. We should all pay him to go to those summer conventions -- every time he does, something new and important for ham radio comes out of the trip.
Wednesday, May 30, 2018
Hans Summers and his QCX -- G0UPL Cracks the Code on Si5351A Quadrature
Pete, Brad WA8WDQ and I were recently e-mailing about our admiration for what Hans G0UPL has achieved with his QCX rig. I cc'd Hans -- we got this nice and very informative e-mail. Be sure to click on the link provided by Hans, and from there go to the link to his FDIM proceedings article. I think that article is a real masterpiece -- there is a lot of very valuable information in there. For a long time, getting quadrature output from the Si5351 seemed like an impossible dream. But Hans has obviously figured out how to do this, opening the door to much better and simpler single-signal phasing receivers. Thanks Hans!
Hi all
Sunday, May 13, 2018
A Construction Technique that REALLY "Nails it" -- But what do we call it?
"Muppet Boards." What do we call this?


