We started with the VFO block first. The most challenging thing was winding the PTO
form. But everyone managed. Other challenges were poor solder joints and missing
connections, which were easy to remedy. They became excellent teaching points.
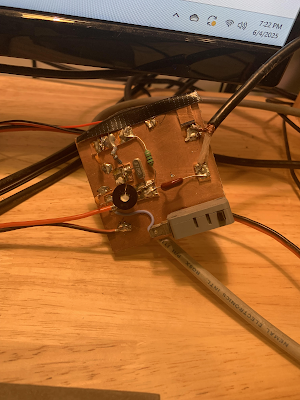
I also noticed that students would look at the (what I called) the prototype Direct
Conversion Receiver that I built to show everyone what it would look like in the end. As
it turned out, this was a valuable part of the group build. Students would take photos of
the prototype so that they could gain a better understanding of the construction of the
receiver.
As students completed their VFO, I would test it using an oscilloscope demonstrating to
them what and how an oscilloscope works and the signals coming from their VFO.
The second block was the Band Pass Filter. This block had easier transformers to wind
compared to the mixer. This allowed a gentler introduction to toroid winding. To aid in
the identification of the windings, I purchased red and green enameled wire that had a
poly-coat that was easy to remove using a blob of solder on the soldering iron. Overall,
this was a simple block for the students to assemble. As students completed their Band
Pass Filter, I connected it to a nanoVNA and allowed them to tune the filter. Another
great teaching moment introducing them to filters and vector network analyzers (VNA),
all if which are on the General and Extra exams.
The third block to be assembled was the Mixer. This had a little more challenging
transformer with the trifler windings. I purchased enameled wire in three colors: copper,
red, and green. The copper-colored wire was coated with enamel which required
scraping to remove. The red and green was the poly-coating the students were familiar
with from building the Band Pass Filter.
The three colors allowed the students to identify the primary (indicated with a dot on the
schematic) and secondary sides. The schematic showed the location of the colors and
the MeSquares they were to be attached to. This alleviated much of the confusion that
can occur with connecting trifler windings (see DCR Mixer Handout.docx).
The forth block was to assemble the Audio Amplifier. By this time the students have
developed their knowledge and skills to assemble the one block that had the most
components. Assembly went smoothly; however, we would have the occasional
misplaced component, bad solder joint, etc. This was the case throughout the build, but
they were welcomed as excellent teaching moments.
When the entire Direct Conversion Receiver was assembled, we would test them first
using a tinySA in signal generator mode and inject a 7.1 MHz carrier. We would tune the
PTO to tune down to 7.0 MHz and up to 7.3 MHz. We had to add an inductance in
series with the PTO to accomplish this range. This took some trial and error. There was
some troubleshooting to be done to find an error or two. Finally, we connected the
receivers to a loop antenna and listened to on-the-air signals. It was not the best
antenna setup, but it gave the students confidence that their receivers were working.
The amateurs in the group took theirs home and hooked them up to their station
antennas to listen further. Each reported good reception.
The Soldersmoke Direct Conversion Receiver Challenge was an excellent group
project. The students learned a great deal from the hands-on experience. W2AEW’s
buffered Colpitts crystal oscillator video was perfect for introducing Manhattan style
construction. Creating a kit of parts, 3D printed templates, handouts, and laser cut base
gave structure to the group build and minimized construction errors. Having a fully built
receiver (that I called the prototype) for students to refer to proved extremely valuable.
Building as a group provided an encouraging environment where the students would
assist each other and share teaching moments (what to do, what not to do). Finally,
there were many teaching moments that helped solidify knowledge and skills and there
were many direct references to the questions on the Technician, General, and Extra
exams. The goal of the group build was met!
Many thanks to the SolderSmoke team for an excellent project!
73, Steve N7HPR
Thanks Steve! More to follow -- Steve's handouts on the construction of each stage are really great.
Stay tuned!